
I don't know about you, but there are many times where I will go to take a pan out of the oven and cannot find a potholder. It still happens, but I've greatly reduced the frequency of the event by adding many potholders to our inventory. (I also have figured out where they all go, so I can track them down, but that's another story.)
Did you have a potholder loom when you were a kid? I did, or at least I got to use one. I do know that I never finished a single potholder. The kit I used came with stretchy nylon loops and no tools and I got so frustrated with it that I quit without finishing even one (I was also an uncoordinated child).
There were (and are) kits available with thick cotton loops, metal frames and tools to help you weave and finish. I bought one of these for myself a couple of years ago, and have had such fun with it!!
In this post, I'm going to share my love of this back-to-basics craft. I'll share my "system," provide links to kits/tools and (bonus!) I have a 12-card set of "recipe" cards (patterns) for you do download and print! I'm going to focus on the traditional loom, but will include some other options at the end.

See the source list for a free download of twelve different patterns, including all those shown in the post. (My favorites are the two at the bottom right, "Quattro" & "Color Gamp.")
I cannot recommend the Harrisville Designs kits highly enough (see sources). They are sturdy, come with everything you need, and are available in two sizes: the regular traditional kit makes two ~6" potholders and the deluxe traditional kit makes six ~6" potholders. (They also have a PRO size, which I'll talk about at the end of this post.) The sell bags of loops in variety packs or individual colors, so you can do whatever you want. (At this time, I have no affiliations; this is an unsolicited rave review of a regular customer.)

 Extras: I have added a few things to my potholder kit that I personally find to be essential, but are listed here as extras.
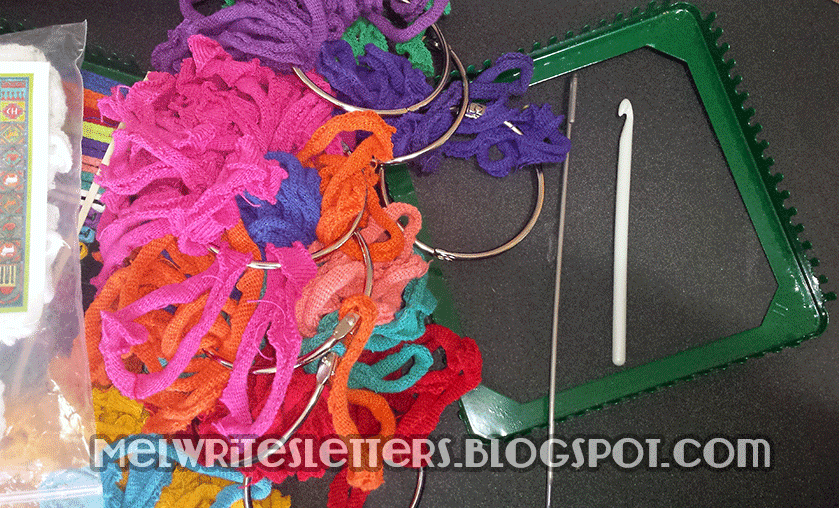
- Shown above, I found a bunch of large 2" & 3"book rings that I use to keep the colors separated. This makes it really easy for me to see that I have a ton of one color left, and just a few of others, and I pick my pattern accordingly.
- Rubber bands: the closer you get to the end of your weaving, the more the loops like to pop off of the pegs. I'll share a picture further down that shows how I use these to keep my work together.
- Sturdy, ergonomic crochet hook: Crochet and I are not friends, so an ergonomic hook helps us stay civil.
- Patterns. Download mine, below, or check out Harrisville Design's Pattern Wizard (make sure to switch to "Traditional"). Of course, you can design your own, or just wing it with lovely randomness.
Tips & Tricks
I'm not going to reinvent the wheel and write up a how-to, since every kit comes with directions, but I will share some things that have helped me keep this activity fun.
 Storage: I'm a big fan of having the right container/bag for projects and this is no exception. I picked up this square fabric basket-type thing at a HomeGoods store. It fits great in a square storage cubby shelf and I always know where everything is.
 Storage: I'm a big fan of having the right container/bag for projects and this is no exception. I picked up this square fabric basket-type thing at a HomeGoods store. It fits great in a square storage cubby shelf and I always know where everything is.
Load your Wrist: If you're following a pattern, spend a few minutes before starting and count out the loops you need, then pile them onto your wrists (only showing on one here so I could take the picture).

Rubber bands: I use thick rubber bands to keep the loops on the pegs. This technique has saved my sanity! You can use one around each side, or (shown), secure a few at a time on two sides. (You just have to avoid grabbing a band with your weaving hook as you go, but it's not been an issue for me.) As you finish, move or remove the bands
 Finishing & the last loop: Okay, I have to admit that I have never figured out how to finish these without a loop at the end, but since I don't mind the loop, I don't worry about it too much. What I do is start at any corner, then use the crochet hook all the way around until I get to the last two loops. I put the hook through the two loops and pull another free loop (doubled) through those two. Then I pull one end of the new doubled loop through its other end and tug. Tadah! Loop. Maybe someday, someone can teach me how to do it another way.


Other Looms
 |
| Traditional (top) vs. PRO loom |
- I recently read an article (in Craftsanity issue 6) about making your own looms, as well as weaving with yarn. I haven't tried it yet, but would like to.
- Harrisville Designs also makes a PRO-size potholder loom. I received one for Giftmas last year, along with extra loops. Since they're larger, they require larger loops, and more of them, so naturally they cost more to make, but seems to be in scale with the cost of the traditional loops. I will say that the larger potholders are pretty epic (seen here with a traditional size on top), but the overall cost is high, especially if you want one of the color kits. Having said that, I'd love to get my hands on the big bag of loops they sell (5 lbs., $90, traditional makes 50 potholders, PRO makes 25). ::drools::
Sources
- Free pattern card download from me: on Drive or on Dropbox (personal use only). Print one-sided (on card stock if possible), and cut into quarters.
- Harrisville Designs Pattern Wizard (make sure you select the right size)
- Looms (Amazon links)
- Traditional size, deluxe (makes six ~6" potholders)
- Traditional size loom (makes two ~6" potholders)
- PRO Loom kit (makes two 8¼" potholders)
- Loops (search around for more options and prices)
- Traditional, brights, makes eight ~6" potholders
- Traditional, multi or individual colors, makes two ~6" potholders
- PRO, multi or individual colors, makes two 8¼" potholders
- Misc.
- Book rings (for organizing loops). (Link to Amazon, because I could not find locally. They'd probably be cheaper if you could.)
- My crochet hook. Size K is the perfect size for me. There are probably better (cheaper) options out there, if you have access to a local yarn store.
- Rubber bands: I use size 64 for the traditional loom. Just bought a bag from an office supply store.
Hi. Enjoyed reading your article. I'm recently retired and was looking for something to fiddle with as I watched TV at night. I tried knitting but didn't like it. Then I started making potholders and really enjoy it. I like the way you end it. It provides and opportunity for another color and seems much easy. d been king of tying the last loop in a sort of knot which works ok but not great. so, just wanted to thank you for the idea. Also, I really like your colors!
ReplyDelete