Pages

Showing posts with label art stamps. Show all posts

Thursday, June 2, 2016

Decorated Envelopes: Alfred Hitchcock

I haven't abandoned the blog, just been crazy-busy. Doing a quick lunchtime post today to share pics and resources of another fun envelope theme: Alfred Hitchcock. I started out combining two movies (Psycho and The Birds), but have since gathered enough great rubber stamps to focus on each movie separately. While The Birds is my favorite of the two movies, I prefer Psycho for envelope themes.

Note: envelopes are available (with postage) as custom orders through my Etsy shop.

On to the sources! Goodness, this was such a fun search. I've been looking for rubber stamps to do this theme for months!
  • Hitchcock vintage postage: eBay. (1998, 32¢, Scott #3226). See my buying vintage postage tips, here (end of post). You've probably noticed by now that my themes start with the postage. It's not essential, but a wonderful addition. 
  • Rubber stamps:
    • Mr. Hitchcock, standing, "Woman Screaming" (obviously Janet Leigh), and Hitchcock profile (not shown): Carmen Veranda. The website is fairly awful, but their service is good and these stamps are excellent quality! Luckily, they're all on the same page. 
    • House, Four Birds & Bird on Branch: Cherry Pie Art Stamps (don't forget to color in that one window with a yellow pencil!)
    • Curtain, left (also available in opposite direction) & Flock of Birds: 100 Proof Press
    • Butcher knife: Rubber Baby Buggy Bumpers (Out of Business (OOB) but I just spotted a similar one over at Leavonworth Jackson (direction flipped))
    • Light switch: neato stuff (OOB)
    • Small blood splatter: Hampton Arts - found a link for you at 123Stitch.com
    • Large blood splatter & blood spray: Inkadinkado Bloody Scene (love this set!)
  • Ink: London Fog, Gray Flannel, Tuxedo Black & Rhubarb Stalk, all from Tsuineko Memento
  • Envelopes: PaperSource.com
Just a brief word on tips and/or my process, since I've covered the topic multiple times in my decorated envelope series:

  • I'm a big fan of monochrome with a dash of color (often red), so I couldn't do these envelopes without a combination of gray and black inks. I prefer dye inks for easy clean-up.
  • The largest envelope you can mail without incurring extra postage costs (barring weight and thickness), is an A9. It easily holds 8½"x11" letter paper folded in half and gives you plenty of space for stamping. A7s are also great - they are the size that I sell (so I can mail them in an A9). Envelopes shown here are not to scale. 
  • Plan your layout a little. If you want to (or it looks like you might have to) overlap a stamp (see the curtain on the bottom right envelope, above), you should stamp the image that will be on top first, then mask it, so when you stamp the other image, it doesn't overlap (see top image - the knife was stamped first, then masked). Here's a link to a basic masking tutorial, but if you search for "rubber stamp masking technique" in any search engine, you should find what you need. No need to bother with masking for the blood splatter. That way lies madness. 
Next up: evil clowns or The Mummy? (I'm also working on The Wolf Man and Dracula themes, as well as The Thing from Another World.)

Wednesday, March 30, 2016

Decorated Envelopes - Legend of Sleepy Hollow

The Legend of Sleepy Hollow had a place in my heart long before I read the original short story by Washington Irving. I was probably introduced to the story via an installment in the Trixie Belden mystery series (#26, The Mystery of the Headless Horseman (1979)), but it has been referred to so much, and adapted so often, that I really can't pinpoint my first exposure.

I do know that I didn't actually read the real thing until three or four years ago. I think I must have whizzed through it, because I would have told you that, while it was a well-told tale, it was not actually that spooky; however, a second read-through is proving me wrong. This time, I slowed down to let Mr. Irving set the scene, and found that if you remember that all of these things are happening in a creepy place that everyone believes is haunted, it's way better (and more fun).

My goddaughter and I share an old connection related to the book, which is the main reason I started compiling materials to create Sleepy Hollow mail. Writing this post has encouraged me to a) watch the film Sleepy Hollow, which I love, and b) re-read the story. While I do that, here are some recent images of Sleepy Hollow mail, with comments. I'll list all sources at the end.

Stamping on poly envelopes is tough, but not impossible. You need a "sticky," permanent ink (I used StazOn) and some patience, because you need to take it slowly and lift your stamp straight up, then wait for the ink to dry.

These are the three main stamps I have for the Sleepy Hollow theme. I'm on the lookout for more, but some of the usual Halloween favorites can be put into play (bats, jack-o-lanterns), plus anything that would be woodsy - trees, birds, etc.

Whenever possible, I like to send "haunted mail," and this sticker is a great addition (see sources).

My first Sleepy Hollow envelope, shown with a hoarded sticker. (One of my pen pals sent me two - I have used one. Since they don't seem to be available, I'm going to work on creating my own.)

I love the lighter gray envelopes for the themed mail because it's already gloomy (white is so stark). On this, I used a fine mist of red spray ink, and medium gray and black stamp pads.

To use the spray ink, get a deep cardboard box and hold the spray bottle as far away from the envelope as you can. Be prepared to try a few times (one pump should do it). This stuff can be pretty nasty if sprayed anywhere else - it was damn hard to get off my fingers - so take care!

While I was working on this post, I starting thinking about how I could make the envelopes even more epic, without spending any extra money. The photo here is the result (so far). I'm still working out the kinks, so follow me on Instagram to see further developments!

I scanned a couple of pages out of an old copy of the book (shown open, above), glued a laser print to an envelope, then hit the edges and random spots with a spray stain (behaves much better than the spray ink, above, but I'd still follow the same steps). I recently found a small Xyron sticker maker in my craft room, so I printed a few images (labeled for reuse) onto photo paper, cut them out using postage-edge scissors, and ran them through the sticker maker. Viola! Faux postage. Inks used were black and dark gray.

Honorable mention, to show off the other Sleepy Hollow Special Delivery sticker. I didn't take a clear picture of it (alone) before mailing. All I used here was the road sign and the sticker, plus the vintage stamps.


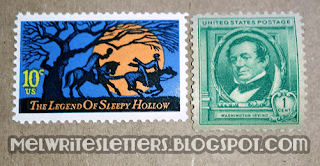
And, of course, what started it all. As I mentioned in the Poe envelope post, many of my themes are inspired by the vintage postage stamps I have collected. The Legend of Sleepy Hollow stamp is a favorite (read more about it here) and its natural companion is Mr. Irving's stamp.

Sources
  • Free download of the short story from Project Gutenberg. I am a fan of reading original works (someday, I'll get through Frankenstein). This is a slice of Americana that has inspired much of what we know of Halloween, so it's good to know the origins! (Not surprising that Irving impacted my favorite holiday (Halloween), since he also kind of invented Christmas as we know it (repeat link).)
  • Interested in getting your own Sleepy Hollow envelopes to send? Contact me via the email link in my profile. I'm working on some ideas and it would help to know if anyone was interested.
  • Rubber Stamps
    • Horseman: Butter Side Down stamps (unmounted, cling-mounted or wood). They also have an Etsy store, where they sell just the wood-mounted stamps.  
    • Try Not to Lose Your Head & Road Sign: Impression Obsession - both are cling only. Linking each to the shop where I bought them. 
    • Bats: from a set by Momenta (gift from a friend)
    • Bird stamp: hand-carved gift from a pen pal.
    • Headstone: unknown, although I think it's from Rubber Baby Buggy Bumpers, which is out of business. Cemetery stamps are available from other sellers.
  • Inks: StazOn black, Ranger Archival in Jet Black & Watering Can (dark gray), Tsukineko's Memento in London Fog (medium gray). Spray ink is from Ranger's Dylusions line in Postbox Red. Spray stain is from Ranger's Distress line in Hickory Smoke. 
  • Misc:
    • May be Haunted sticker: Evil Supply Co. They also made the Sleepy Hollow Special Delivery stickers, but do not offer them in their shop at this time. 
    • Tape: This is Spinal Tape by Copernicus Toys (Amazon link). I already own this, so I use it, but it is pretty much crap. It doesn't stick to paper well & I have to add a layer of clear tape over it. 
    • Paper envelopes are from PaperSource (#10 & A9), document box was a re-use, poly envelope was from a bulk purchase.

Sunday, March 13, 2016

Decorated Envelopes - Poe and the Raven (Nevermore)

Since remounting and reorganizing all of my rubber stamps, I've felt compelled to use them more. Naturally, being me, I've also felt compelled to add to my collection, with one main goal in mind: to decorate my outgoing mail! Since I love themed mail, that's where I've been focusing my attention.

I decided to go kind of meta on some envelopes and include some vintage postage stamps from my collection in the theme. What ended up happening is that I started planning envelopes based on what postage stamps I could incorporate, and scouted out rubber stamps, etc. to fit the theme (it's just how my brain works). First up are some Edgar Allan Poe-themed mailings. I hope you enjoy! (See end of post for sources.)

[Disclaimer: none of this is necessary. The letter in the envelope is what counts, not what's on the envelope or, for that matter, the goodies inside. It's just another way to have fun with mail. I don't elaborately decorate every envelope, just some of them.]


To be honest, the first Poe/Raven envelopes didn't start out to be quite such a production! I found and ordered a Poe rubber stamp to go along with my postage stamps. I stamped it on white tissue paper, using a dark, solvent ink pad, mainly so I wouldn't waste envelopes if I messed up. That's when I discovered something that's probably common knowledge to other stampers: this ink was so dark that I could flip the paper over and use the mirror image. (Note: if you use this method, the ink will go all the way through the paper. I was luckily able to clean up my desk with alcohol swabs, but if I'd stamped on a different surface, I might have damaged it permanently. Next time, I'll have some scrap paper underneath!)

Poe facing left is a mirror image (back side of tissue paper).
I used modge podge to affix two of the images to envelopes, then decided that it needed more. I used some spray stains I have (that I still really haven't figured out how to use) to give the background some more detail. Should have done that first (which I did for the next two)! I then pulled out the small raven and "Nevermore" stamps that I had already planned to use, and also grabbed a new raven and candlestick and tried several variations. I tend to do "limited edition" runs, and quit at four.

But then... I realized that I had STUFF. I had some old recordings and put together a mini mixed CD. Ribbon became bookmarks, I split up a small sheet of raven stickers (only six to a pack) and, finally, remembered the Edgar Allan Poe bandages I had in my goody drawer. This is totally overkill, but it was so much fun to put together! Future envelopes will not be this extensive! (It was kind of exhausting. And, like I said, overkill.)

I will definitely not do the mini-CD again, since it appears that not many people have a drive that will accept them. It was fun, though, because it fit in the #10 envelope.

One last touch: I realized that if all of the little items ended up bunched together in the envelope, this could put the thickness into "package" territory once a letter was added. It's my goal to avoid this extra cost*, so I cut some thin cardboard (I save all of the sheets that come with postage stamps) to fit the envelope and taped all of the items to it. (It would also help protect the CD.) I also added a washi tape tab at the top of the card to help the recipient get it out of the envelope. I had to add an additional 22¢ stamp for the weight, not shown in bottom pics, but my goal of keeping it under the thickness restriction was met.

Later, I found a background rubber stamp with some of The Raven as text. I'm still experimenting with those, but they've been fun so far. The one pictured here went to the winner of the Halloween vintage postage stamps from a previous post.

*71¢ to 93¢ for a heavier envelope, but minimum $2.54 for any weight that exceeds the height/thickness limit. That's a pretty dramatic difference.

I recently posted a question on Instagram, asking my current pen pals to let me know if they would like (or wouldn't mind) getting Halloween-themed mail year 'round. I'm also sending out these little cards as letters go out. For any that say yes, I'm marking their page in my log accordingly. For those that are not interested, no worries. I have other ideas.

(l): normal stamped image; (r) reverse side of tissue paper
Sources

  • Ink for the tissue Poe & CD: StazOn black. Other stamped images: Ranger Archival in Jet Black.Block of text background (red envelope) used Ranger Archival in Watering Can. The spray stain is from Ranger's Distress.line.
  • Envelopes: The #10 gray envelopes are from Paper Source ("cement," being discontinued). The red envelope is from a random office supply store, left over from Xmas.
  • Sticker from Little B (technically a crow, but they're related)
  • Ribbon: sorry, can't give source. I bought it at a rubber stamp store in Northville, MI called Stampeddler Plus last fall.
  • Bandages: Archie McPhee (for added fun, I bought mine in Hell, MI)
  • Stamps


Sunday, February 14, 2016

Rubber Stamp Cleanup, part 2

I just threw away* a hug pile of wooden blocks from my stamp collection. It's okay - I took all of the stamp parts (dies) off first. Back here (part 1), I went through how I did that. The subject of this post is the next step: remounting them all onto static clink backing and getting them into their new storage/home. Read to the end for a mini giveaway.

Disclaimer: this was a personal decision for dealing with my property. Your mileage may vary and you need to make sure you want this and know how to do it. (I hate including these things, but I recently read some comments on a blog post or forum where someone just blindly followed a random stranger's tip for revising a planner and this person destroyed an expensive binder because they didn't think it through. So, basically, think it through.)

Material List (updated)


Stamps on thin EZ Mount
Unmounted stamps - see part 1 for the how-to. One update: since most of my collection was several years old, I was dealing with a lot of traditional red cushion mounting; however, newer stamps seem to be using this gray foam (similar to what is part of the static cling set up) and it does not always cooperate with the cold or hot process explained in my other post. It's not just the cheap ones like I thought. I paid a stupid amount of money for a large mounted stamp because I fell in love with the quote on it and didn't think to make a note and look online. Getting that off the block/foam was a nightmare**.


EZ-Mount Static Cling mount materials (with foam for just the rubber piece, "thin" for those with their rubber still attached). I can't recommend The Stampin Place highly enough. They ship quick and handled a delivery issue (not their fault) super fast (no affiliation).

Stamps on traditional (with cushion) EZ Mount
How much? If you can be more patient than I was, unmount your stamps first, then lay them out on sheets of 8½x11" paper, leaving some room to get your scissors around. That will give you a pretty good idea of how much you need. I used less than I thought I would, but also misjudged how many sheets of the thin cling I'd need, so I have just under 1 sheet of the normal thickness left over, and too much of the thin, which I probably won't use much of. Alternately, order a sheet of each and try a few stamps out to see if you like it.

Storage solution. I went with binders and the pages that The Stampin' Place sells and I'm very happy. I have two binders and got 1 set each of tabs and pages. The tabs came in handy because I have multiple themes in one big binder (see video). You can also probably use older CD jewel cases (not the super-skinny ones) or, probably, empty DVD cases. Whatever will allow you to group your stamps as you like and give them a firm surface to stick to.

Really sharp scissors, preferably with a non-stick surface (they'll still get sticky, but less so). I was very happy with the ones I ordered.

Alcohol swabs to de-gunk your scissors as you work.

Acrylic blocks in a variety of sizes. You don't need ALL of the sizes, but you do want a few because if the block is too big, it can wobble on the ink pad or your stamping surface. If it's too small, you can't get even pressure to make the impression. I advise getting a coupon and hitting one of the big box craft stores for a set. 

Damp paper towel, when it's time to put into your storage.

Instructions


  1. Once you've unmounted some (or all) of your stamps and have all of your materials, peel away the backing from the (very) sticky side of the EZ Mount (the side with all the printing). Set the backing aside to protect any leftovers. 
  2. Lay out your stamps on the appropriate thickness (thin for those with cushion still attached). I have blurry pictures of this process; if anyone wants to see, comment with a way to reach you and I'll share them via Drive or something. 
  3. Cut out, taking care not to undercut (any stamp surface with detail needs to be fully supported). I err on the side of caution and leave a small margin. Replace printed backing on the sticky side to preserve remaining cling sheet & put it away.
  4. Peel the paper backing off of the cling (non sticky).
  5. Place into your chosen storage system. If your stamps don't want to cling to the pages, dampen them slightly. I kept a damp paper towel with me as I organized my collection after my marathon mounting and cutting sessions; I just tapped the back of the stamp on the towel and pressed it down onto the page. 
Peek at my collection (continued apologies for the camera work and sound quality)


Mini Giveaway (updated to include image)

I have 1 sheet of thin EZ Mount to give away (US and Canada only this time, sorry). It was bent during shipment and replaced, so I thought it would be a good opportunity for someone else to try cling mount. The thin version is goof for stamps that still have their cushion attached. Want to try? Comment below. That's it. It's okay if you have won before. I'm aiming for FOUR comments this time. Oooh. But I'll end it in a week, regardless. On Feb. 21st, I'll pick a winner from the comments and mail out the sheet (so make sure I have a way to reach you!!). Easy as pie. No requirements to share (although I appreciate and love the shares) or to post on Instagram and tag people. Just comment. I'm also going to throw in a mini stamp pad (summer sky color), because I accidentally bought two of the same colo, and a 1" acrylic block. (Note: this sheet of EZ Mount is bent, but is good for mounting several stamps with cushion attached (also probably works for very small stamps).)


*They are all coated with something or have adhesives, stickers, etc. on them. I doubt they're recycle-able.
**Now that I have converted my entire collection, my goal is to never buy another mounted stamp (what a waste), so I do most of my shopping online, where many shops offer unmounted dies as an option.

Wednesday, February 3, 2016

Rubber Stamp Clean-up, part 1

Where did all of my stamps go?!
I own collections of two types of stamps. The postage variety you've seen plenty of, but I haven't posted much about my rubber art stamp collection. My love of these stamps dates back to early childhood, when my paternal grandmother let us play with a very old set of stamps intended for schoolkids. These weren't rubber, but a very hard substance, maybe even wood. I used the crap out of those! Years later, something like 25 years ago now, I came across some really great stamps in a gift shop in Cadillac, MI. I was in a temporary "cute" phase and bought several. And then I went batshit insane like I do with every other hobby and started amassing huge quantities of things. Also like every other hobby, my interest in it waxed and waned, and I added stamps and used them when I was into it, and they languished when I wasn't.

A few months ago, I started working on organizing my office. I had new furniture with lots of drawers, and still more stuff than I could possibly fit into them, including a collection of rubber stamps that extended back well over 20 years (not counting the set from my grandmother that I'm never getting rid of). I decided that I could only have two drawers of stamps and accessories and proceeded to cull the massive collection by at least half. I had long since left the cute phase behind, so those were the easiest to get rid of. What was left was a mixture of permanently mounted (on wooden blocks) and a variety of applications to stick a stamp to an acrylic block. I had an entire collection of crying women, lots of silly and sarcastic ones, plus (naturally) tons of Halloween stamps. 

Long story short, I decided that I wanted all of my stamps to be the same style and ordered materials to convert every single one to static cling (those that weren't already that style). What I ordered was something called EZ Mount. It comes in two thicknesses, and if you're going to convert a collection, you'll want both kinds. The thin kind is good for stamps that won't come off the thick foam mount they came on. The normal (thick) kind is for the ones that you were able to separate from the block and old foam (just the die). One side is super sticky, to adhere to the stamp, and the other side is smooth and it will temporarily stick to an acrylic block or a hard plastic surface like a CD or special organization tabs and pages (which I ordered (one set of each to start); I also found a big binder to stick them all in).

When I'm done, all of my stamps should fit into that binder and I'll get at least one drawer back (still need one for accessories like stamp pads, embossing powder, heat gun, etc.). I ordered the cling sheets and pages/tabs from The Stampin' Place (no affiliation). Some of the items are on Amazon, but the prices were painful. This shop has reasonable prices (except the scissors I link to below, which were cheaper on Amazon) and takes PayPal. You can use any acrylic blocks -- I got a set at a craft store with a 40%-off coupon to supplement the few I had from way back.

That was a while ago, and I still had the bulk of my remaining collection in a drawer on wooden blocks. The other night I decided to just get started. I looked up suggestions for "un-mounting" the stamps and dove in. It wasn't as bad as I thought. Except for a few stubborn ones, they all either separated from the block easily with their foam in good shape, or the rubber part (the die) peeled right off the foam. Less than ten percent needed special care (the smaller or cheaper a stamp, the more likely they were mounted in a non-traditional way).

Feel free to look around the interwebs for some other suggestions. The key is be patient. and peel slowly and carefully. Once you have a die that brought some chunks of foam along with it, you have a less fun challenge ahead. (Image: far right is a die that came off cleanly, center is a couple that wouldn't come off their foam, but were in okay condition, left are some that came off less than smoothly.)

There are two main ways to separate stamps from the blocks
  1. Cold. I tried this after I'd done the majority of stamps the second way, but wish I'd tried it first! I put a bunch of stamps in the freezer for 30 minutes or so (15 might be enough). Then I pulled a fingertip up against the edge of the rubber in a few places to see if it would lift. When I found that spot, I carefully lifted the die away and slowly peeled it off of the foam. A couple peeled right off the block, with the foam intact. I  have both kinds of mounting materials, so I let them be. (At this point, my poor thumbnails, already normally a mess, were just toast.)
  2. Heat. The procedure is the same as above, except you microwave the stamps (rubber side up) one at a time for 10-12 seconds ( I split the difference and went with 11 - some people say 20, but that seems like a lot). I used this method for the majority of stamps. It worked pretty well,
    but the heat also released ink and oy, was I a mess! If I had to do it again, I'd start with cold, and set aside any stamps that wouldn't cooperate, and try heat on them.
Scrubbing away the leftovers.
What about those that didn't cooperate? I had a handful of dies that brought either a tiny bit of backing with them, up to huge, terrible chunks. The majority of these were mounted using non-traditional methods like that double-stick mounting tape or some weird black foam I've never seen. I decided to take a risk and try an oil-based cleaner like GooGone to release the adhesive holding the foam to the rubber.. (If you decided to do this, take care and test it out on something you don't love, just in case. Again, I'm no expert.) I added a tiny bit to the back of the stamps and let it soak for just a few minutes. Then I took a nylon scrubber that I dipped in warm water and rubbed the back of the die. Most of the bits left behind fell right off. The two stamps with the weird black foam and the two with mounting tape (none of them my work) took a little more work, but eventually it all came off. I immediately rinsed each die in warm water and patted it dry. 

Next step (after the scissors I ordered arrive), will be to re-mount all of these stamps onto the EZ Mount and cut them out. Once they're in the binder, I'll need to find a way to decipher what some of them are (no more helpful images on the back). The plus side is that the acrylic blocks make image placement a breeze, and the binder should mean all of my stamps are in one place and easy to flip through. Unmounted stamps are way cheaper, too, and it's the work of seconds to apply the cling foam.

Quite honestly, the main drawback that I see in going to an all static cling system is that you have to either keep a list or have a damn good memory to know where stamps came from (if you care). If you have cool stamps, someone will inevitably ask "where did you get that stamp?!" (Of course some of my stamps are so old that I can certainly refer to the list I made before I discarded the wood, but my answer has a good chance of being "they're long out of business, sorry.")

When I do start re-mounting my collection, I'll take some pictures and do a follow-up. [See part 2 for an update and mounting instructions.]