Pages

Showing posts with label tutorials. Show all posts

Monday, April 4, 2016

Reclaiming Stamps Tutorial 2 - Self-adhesive

Some weeks ago, in my first Free Stamps Tutorial, I shared how I went about reclaiming unused gummed (vintage) postage stamps if you mess up addressing an envelope. I promised to write up something for modern, self-adhesive stamps at some point in the future. Well, the future is here!!

Disclaimer: as always, I'm not an expert. I'm also not a "real" stamp collector, in that I'm generally interested in reclaiming unused stamps to put back in my collection, although I'm starting to use canceled stamps as part of collages. To separate stamps in order to store them in albums probably requires special steps and gloves or something like that, so if that's your goal, I advise seeking out advice from professionals. 

First, let me show you why you can't just use the soak-in-warm-water method for newer stamps. This was a stamp that I cut off one of my turquoise envelopes that I messed up.

Not only did some of the dye from the paper leach onto the stamp, if you look closely, you can see that it's wrinkled and messy. It is probably still usable, but certainly not pretty.

I tried a couple different methods with the stamps I had saved. None worked, so I had to wait until I had more stamps. I received an envelope with a stamp that I really wanted to keep and display (it was sent for that purpose), so I decided to try something besides the non-effective water methods and hit the search tools.

I landed on the American Philatelic Society's Tips and Links page, and followed the link in the "Soaking Self-Adhesives" section to a PDF about the magic of  removing self-adhesive stamps from envelopes. I recommend that you read the article, but here is my experience.

Materials: The article recommends one of two products: an adhesive remover called "Bestine," which I could not find locally, or a 100% natural citrus oil product. I was able to find "Pure Citrus," the exact product recommended, in the air freshener section at Home Depot for $4.97, so I'm basing this entry on using that. You want one labeled 100% natural, containing just orange oil. (OdoBan makes an air freshener/adhesive remover (right on the label) that's 99.5% natural and costs $1 or so less. It may be perfectly fine, but I went with the 100%.)

In addition to the Pure Citrus, you need some paper towels and cotton swabs. I suggest having a piece of parchment paper handy as well.

Instructions
  1. For plain paper envelopes*, cut out the stamp, leaving a little border of paper. 
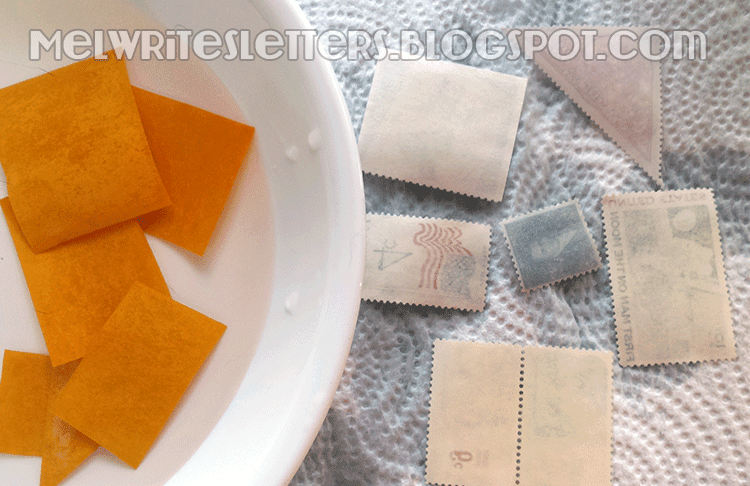
  2. Spray a little of the oil into a small dish (disposable plastic cup, etc., is great, but regular dishes will wash up fine with soap & hot water). 
  3. Put the stamp face down on a couple of layers of folded paper toweling.
  4. Dip one of the swabs into the oil and rub it over the paper until it's lightly saturated. Wait a few seconds. The stamp should easily peel away from the paper. If it doesn't, just add a little more, wait, then try again. You can also spray directly onto the back of the piece, but when I did it in a dish, the next stamp was saturated (it's fine, but I wanted to avoid that). 
  5. There will be some adhesive remaining on the stamp. The article suggests rubbing a little talc on it, but we didn't have any, so I took another swab with a little oil on it, and gently rubbed the back of the stamp. Most or all of the adhesive came away.
  6. Let it air dry for a few minutes, then store in a folded piece of parchment, keeping the stamps separate. After a while, you'll know if any adhesive remains and you can store those stamps in a glassine envelope or folded parchment paper until ready to glue onto envelopes and use.**
*If the envelope is thick, you can work on the stamp where it is, face-up, but slowly. Don't soak the whole thing, just wet an edge with the oil, get the edge up, then gently rub the swab between the stamp and paper, pushing towards where they meet, peeling slowly until it comes away. Then, follow steps 5 & 6, above.

**If the stamps are from another country, you can always keep them just to look at if they're awesome - like this one - or share with a collector.

Seriously, isn't this stamp awesome?! I couldn't tell until I saw it close up that they were indoors, in a blanket fort, which is even cooler than outdoors in a tent, which is what I originally thought. Because I've decided that this older child is reading a ghost story to the younger one, it's going to look wonderful next to my Haunted Canada stamps...as soon as I figure out how and where to display them! They're really about storytelling and pretend, but hey, I used my imagination to create a back story!

The little flecks are from the envelope, which was very heavy-duty, with a gold foil pattern. 


Monday, March 28, 2016

Potholder Looms - Practical Nostalgia

Rediscover an old friend. Frenemy?

I don't know about you, but there are many times where I will go to take a pan out of the oven and cannot find a potholder. It still happens, but I've greatly reduced the frequency of the event by adding many potholders to our inventory. (I also have figured out where they all go, so I can track them down, but that's another story.)

Did you have a potholder loom when you were a kid? I did, or at least I got to use one. I do know that I never finished a single potholder. The kit I used came with stretchy nylon loops and no tools and I got so frustrated with it that I quit without finishing even one (I was also an uncoordinated child).

There were (and are) kits available with thick cotton loops, metal frames and tools to help you weave and finish. I bought one of these for myself a couple of years ago, and have had such fun with it!!

In this post, I'm going to share my love of this back-to-basics craft. I'll share my "system," provide links to kits/tools and (bonus!) I have a 12-card set of "recipe" cards (patterns) for you do download and print! I'm going to focus on the traditional loom, but will include some other options at the end.

I have actually given these as gifts, but the reception was mixed. You really have to know your audience, I guess. Personally, I love them. They are thick enough to handle just about any pan, dish, etc. Because they are cotton, they won't melt and can also serve as trivets. What's really fun is the variety of patterns you can create. Once you start getting near the end of your supply, the options obviously change, but they're still fun and functional, even if they aren't my favorite color (I never get enough of the bright, light green loops!).

See the source list for a free download of twelve different patterns, including all those shown in the post. (My favorites are the two at the bottom right, "Quattro" & "Color Gamp.")


Essentials: the basic kit I purchased comes with a metal frame, a plastic crochet hook, a long metal weaving hook and a bunch of cotton loops in a variety of colors.

I cannot recommend the Harrisville Designs kits highly enough (see sources). They are sturdy, come with everything you need, and are available in two sizes: the regular traditional kit makes two ~6" potholders and the deluxe traditional kit makes six ~6" potholders. (They also have a PRO size, which I'll talk about at the end of this post.) The sell bags of loops in variety packs or individual colors, so you can do whatever you want. (At this time, I have no affiliations; this is an unsolicited rave review of a regular customer.)

I don't really recommend the Klutz Potholders book & kit. The plastic loom is the same size as the metal ones above, and it comes with a crochet hook, but the loops are a nylon/cotton blend (resulting in a smaller potholder) and there is no weaving hook. As for the pattern book (why I bought it)...there's nothing in there that you can't find online (weaving patterns, projects to make out of squares, that kind of thing). However, if you already have one, play with it!! The stretchy loops are easy to work with and the end result is fine for most kitchen duties. You just need to come up with a long hook that will help you pull the loops through. Since I have the kit, I'll probably make more in the future, and will post images on Instagram, so if you're interested, follow me there. I may do an update blog post, because I'm going to try regular weaving, but I'm not sure when that will happen.

Extras: I have added a few things to my potholder kit that I personally find to be essential, but are listed here as extras.
  • Shown above, I found a bunch of large 2" & 3"book rings that I use to keep the colors separated. This makes it really easy for me to see that I have a ton of one color left, and just a few of others, and I pick my pattern accordingly. 
  • Rubber bands: the closer you get to the end of your weaving, the more the loops like to pop off of the pegs. I'll share a picture further down that shows how I use these to keep my work together. 
  • Sturdy, ergonomic crochet hook: Crochet and I are not friends, so an ergonomic hook helps us stay civil. 
  • Patterns. Download mine, below, or check out Harrisville Design's Pattern Wizard (make sure to switch to "Traditional"). Of course, you can design your own, or just wing it with lovely randomness.
Tips & Tricks
I'm not going to reinvent the wheel and write up a how-to, since every kit comes with directions, but I will share some things that have helped me keep this activity fun.

Storage: I'm a big fan of having the right container/bag for projects and this is no exception. I picked up this square fabric basket-type thing at a HomeGoods store. It fits great in a square storage cubby shelf and I always know where everything is. 

Load your Wrist: If you're following a pattern, spend a few minutes before starting and count out the loops you need, then pile them onto your wrists (only showing on one here so I could take the picture). 

Rubber bands: I use thick rubber bands to keep the loops on the pegs. This technique has saved my sanity! You can use one around each side, or (shown), secure a few at a time on two sides. (You just have to avoid grabbing a band with your weaving hook as you go, but it's not been an issue for me.) As you finish, move or remove the bands
Finishing & the last loop: Okay, I have to admit that I have never figured out how to finish these without a loop at the end, but since I don't mind the loop, I don't worry about it too much. What I do is start at any corner, then use the crochet hook all the way around until I get to the last two loops. I put the hook through the two loops and pull another free loop (doubled) through those two. Then I pull one end of the new doubled loop through its other end and tug. Tadah! Loop. Maybe someday, someone can teach me how to do it another way. 


Other Looms
Traditional (top) vs. PRO loom

  • I recently read an article (in Craftsanity issue 6) about making your own looms, as well as weaving with yarn. I haven't tried it yet, but would like to. 
  • Harrisville Designs also makes a PRO-size potholder loom. I received one for Giftmas last year, along with extra loops. Since they're larger, they require larger loops, and more of them, so naturally they cost more to make, but seems to be in scale with the cost of the traditional loops. I will say that the larger potholders are pretty epic (seen here with a traditional size on top), but the overall cost is high, especially if you want one of the color kits. Having said that, I'd love to get my hands on the big bag of loops they sell (5 lbs., $90, traditional makes 50 potholders, PRO makes 25). ::drools::


Sources


Sunday, March 6, 2016

Custom Sticky Notes

We live in a digital world, but just about everyone still has occasion to jot down some thoughts or leave a note. For those of us who are letter writers, we can probably think of many uses for sticky notes and several for customized ones.

Here's an easy DIY project for you: sticky notes that you can customize or personalize to your heart's content.

I've been making my own personalized sticky notes for some time. They are inexpensive (compared to having them printed) and can be highly customized. I wasn't a huge fan of the templates I started out using, so I made my own, which I'm sharing today (8½x11" only right now -- I can do A4 if there is interest). The only drawback would be for anyone bothered by the virtual impossibility of having them in a perfectly square stack (see image).

What do you need?
  • My templates (or make your own**). The PDF is the layout copy (with printed grid lines). The Word doc is the print copy (without printed grid lines) that you can customize to include your own text or art.
  • 3x3" sticky notes If you want a different size note, see the details at the end of this post** to see how to make your own guides. (I'm avoiding naming brands in general, but I really do recommend Post-it notes: you want these to STICK during printing; I wouldn't trust dollar store notes in my printer.)
  • Inkjet printer (I recommend printing the actual notes on an ink-jet printer, just to be on the safe side. The layout sheets can be printed on any kind of printer).
  • MS Word (Open Office Writer should also work okay)
  • Artwork (clipart, logo, etc.), or you can just type some text. To show that you don't need fancy software, I made my "logo" (above) in PowerPoint and saved it as an image. 

How to make your own custom sticky notes: 
  1. If you have access to a copier, print one copy of the layout document, decide which will be your top edge* and mark it. Then make as many copies as you like (each will produce six notes).
    If you don't have access to a copier, print as many copies of the layout document as you like, then mark the top on each page*. 
  2. Apply sticky notes to the squares on the layout, with the sticky edge towards the designated top edge (any other way might lead to paper jams).
  3. On your computer, add your details to the print version, making sure to rotate them so they'll be aligned to the real top edge of your note*. These guides are just a table and are not locked, so if you want text (e.g. "from the desk of...") at the bottom, consider using a text box instead of hitting [Enter] a bunch of times. The fun part is that you can do up to six different versions in one go, with different images, text, etc. 
  4. Print this version onto the layouts that you've applied the notes to, making sure the top of the layout sheet is pointing in the right direction for your printer*.
  5. Peel notes off of the layouts and stack as best as possible.

* My old printer fed paper at the short edge, so I marked the actual top of the page as the TOP and aligned my notes accordingly. My current printer tray feeds pages along the long edge. so next time, I'll have to make one of the long edges the top to avoid jams. This makes things more complicated, because I will also have to remember to rotate the content in the grid so they'll be in the right place on the printed notes. I actually ran some tests through the old way and they were fine, but your mileage may vary. As always, I'm not an expert and cannot accept any responsibility for issues that arise with equipment I've never seen.

I may do a rotated version for printers like mine.

** All you need to do is create two almost identical versions of a document with the correctly-sized grids. On the layout version, the grid lines will print so you can align your notes. On the print version, the grid lines should NOT print. Only what you add to the spaces intended for your notes will print.


Tuesday, January 26, 2016

Reclaimed Postage Stamps Tutorial

This tutorial will show you how to reclaim non-canceled vintage (gummed) stamps from messed up envelopes (or for collage purposes).

Far too often, I mess up envelopes I'm planning to mail, or decide not to send something, so I definitely want to get those stamps back before the envelope goes in the trash! Because I order stamps via eBay a lot, I sometimes get cool stamps on packages that I might be able to use in a collage. Older, gummed stamps are far easier to reclaim than modern, pressure-sensitive (sticker) style stamps*; I have not had wonderful luck getting the sticker-style stamps off of paper, but have had amazing luck reclaiming vintage/gummed stamps.

This how-to is not for stamp collectors who put stamps into albums. You really want to find an expert (there are probably several on YouTube) who will demonstrate what tools, etc. to use. 

First, cut off the section containing the stamps (top pic). 

Cut out each stamp close to the edge without cutting the actual stamp. (If the stamps are still connected, you can leave them that way.)

Next, get a large, shallow bowl or dish and fill it with hot tap water. 

One by one, add your cut-apart stamps and tap them gently to submerge. Just do a few at a time - a little gumming may remain and you don't want them to stick together!

Wait a few seconds. It may take longer, but in the batch I did this morning, one stamp was floating free from its backing before I had added them all to the bowl.

Remove the stamps from the water with your fingers or tweezers and lay them on a paper towel. I usually set them out face up, flip them after about a minute (shown, right), then cover them with something lightweight & water-resistant to keep them flat (and safe from the cats' antics). 

When they're completely dry, put unused ones back (wherever you keep your stamps (I keep mine in a 3-ring binder, with one labeled sheet-protector for each denomination)) and toss the used ones into your ephemera collection.

When you're ready to use your reclaimed stamps, you'll need a good adhesive (I use Elmer's extra-strength office glue sticks; some craft glue sticks don't hold as well).

*Bonus pic, and a promise: I'll put together a tutorial showing how to retrieve modern, self-adhesive stamps from messed-up envelopes (or SASEs included in begging envelopes).

Update: done! See tutorial, here.