Pages

Showing posts with label vintage postage. Show all posts

Thursday, June 2, 2016

Decorated Envelopes: Alfred Hitchcock

I haven't abandoned the blog, just been crazy-busy. Doing a quick lunchtime post today to share pics and resources of another fun envelope theme: Alfred Hitchcock. I started out combining two movies (Psycho and The Birds), but have since gathered enough great rubber stamps to focus on each movie separately. While The Birds is my favorite of the two movies, I prefer Psycho for envelope themes.

Note: envelopes are available (with postage) as custom orders through my Etsy shop.

On to the sources! Goodness, this was such a fun search. I've been looking for rubber stamps to do this theme for months!
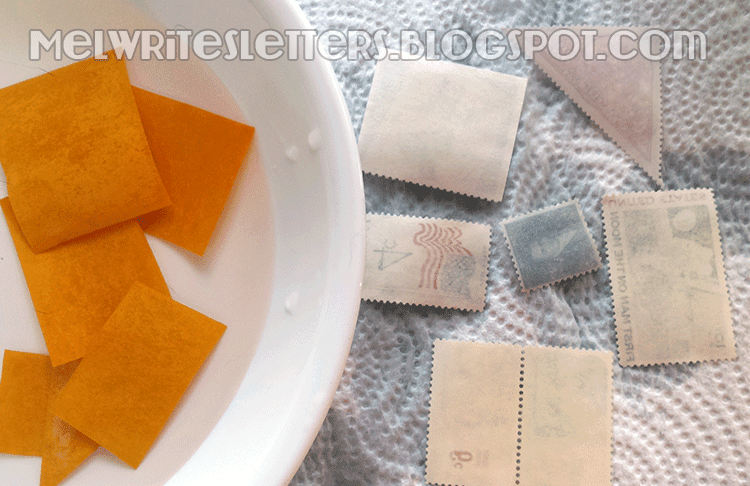
  • Hitchcock vintage postage: eBay. (1998, 32¢, Scott #3226). See my buying vintage postage tips, here (end of post). You've probably noticed by now that my themes start with the postage. It's not essential, but a wonderful addition. 
  • Rubber stamps:
    • Mr. Hitchcock, standing, "Woman Screaming" (obviously Janet Leigh), and Hitchcock profile (not shown): Carmen Veranda. The website is fairly awful, but their service is good and these stamps are excellent quality! Luckily, they're all on the same page. 
    • House, Four Birds & Bird on Branch: Cherry Pie Art Stamps (don't forget to color in that one window with a yellow pencil!)
    • Curtain, left (also available in opposite direction) & Flock of Birds: 100 Proof Press
    • Butcher knife: Rubber Baby Buggy Bumpers (Out of Business (OOB) but I just spotted a similar one over at Leavonworth Jackson (direction flipped))
    • Light switch: neato stuff (OOB)
    • Small blood splatter: Hampton Arts - found a link for you at 123Stitch.com
    • Large blood splatter & blood spray: Inkadinkado Bloody Scene (love this set!)
  • Ink: London Fog, Gray Flannel, Tuxedo Black & Rhubarb Stalk, all from Tsuineko Memento
  • Envelopes: PaperSource.com
Just a brief word on tips and/or my process, since I've covered the topic multiple times in my decorated envelope series:

  • I'm a big fan of monochrome with a dash of color (often red), so I couldn't do these envelopes without a combination of gray and black inks. I prefer dye inks for easy clean-up.
  • The largest envelope you can mail without incurring extra postage costs (barring weight and thickness), is an A9. It easily holds 8½"x11" letter paper folded in half and gives you plenty of space for stamping. A7s are also great - they are the size that I sell (so I can mail them in an A9). Envelopes shown here are not to scale. 
  • Plan your layout a little. If you want to (or it looks like you might have to) overlap a stamp (see the curtain on the bottom right envelope, above), you should stamp the image that will be on top first, then mask it, so when you stamp the other image, it doesn't overlap (see top image - the knife was stamped first, then masked). Here's a link to a basic masking tutorial, but if you search for "rubber stamp masking technique" in any search engine, you should find what you need. No need to bother with masking for the blood splatter. That way lies madness. 
Next up: evil clowns or The Mummy? (I'm also working on The Wolf Man and Dracula themes, as well as The Thing from Another World.)

Sunday, April 17, 2016

My Etsy Shop has been reopened

I finally took the plunge and reopened my poor Etsy shop, after I got some stock together.

The shop is at stitchymel.etsy.com & you can get updates on Instagram account @epicmel.shop (there is already a coupon code* over there and I'll be putting together some kind of follower contest soon). To get started, I'm focusing on my love of snail mail, but may expand into other areas in the future.

I'm most excited about the note card packages. Since decorating the envelopes is my love, that's where I decided to focus, and naturally had to include coordinating vintage postage! Each envelope also comes with a flat note card with the option to have it blank or with a design stamped on it.

I only do these envelopes in limited runs. At this time, there are three each of four designs available. I'm working on some other ideas and don't know when I'll repeat the themes.

*I'm new to the coupon thing, so I messed up and put in a minimum ($9) when I meant it to be for any amount, but I'll refund the difference for smaller orders.

Wednesday, March 30, 2016

Decorated Envelopes - Legend of Sleepy Hollow

The Legend of Sleepy Hollow had a place in my heart long before I read the original short story by Washington Irving. I was probably introduced to the story via an installment in the Trixie Belden mystery series (#26, The Mystery of the Headless Horseman (1979)), but it has been referred to so much, and adapted so often, that I really can't pinpoint my first exposure.

I do know that I didn't actually read the real thing until three or four years ago. I think I must have whizzed through it, because I would have told you that, while it was a well-told tale, it was not actually that spooky; however, a second read-through is proving me wrong. This time, I slowed down to let Mr. Irving set the scene, and found that if you remember that all of these things are happening in a creepy place that everyone believes is haunted, it's way better (and more fun).

My goddaughter and I share an old connection related to the book, which is the main reason I started compiling materials to create Sleepy Hollow mail. Writing this post has encouraged me to a) watch the film Sleepy Hollow, which I love, and b) re-read the story. While I do that, here are some recent images of Sleepy Hollow mail, with comments. I'll list all sources at the end.

Stamping on poly envelopes is tough, but not impossible. You need a "sticky," permanent ink (I used StazOn) and some patience, because you need to take it slowly and lift your stamp straight up, then wait for the ink to dry.

These are the three main stamps I have for the Sleepy Hollow theme. I'm on the lookout for more, but some of the usual Halloween favorites can be put into play (bats, jack-o-lanterns), plus anything that would be woodsy - trees, birds, etc.

Whenever possible, I like to send "haunted mail," and this sticker is a great addition (see sources).

My first Sleepy Hollow envelope, shown with a hoarded sticker. (One of my pen pals sent me two - I have used one. Since they don't seem to be available, I'm going to work on creating my own.)

I love the lighter gray envelopes for the themed mail because it's already gloomy (white is so stark). On this, I used a fine mist of red spray ink, and medium gray and black stamp pads.

To use the spray ink, get a deep cardboard box and hold the spray bottle as far away from the envelope as you can. Be prepared to try a few times (one pump should do it). This stuff can be pretty nasty if sprayed anywhere else - it was damn hard to get off my fingers - so take care!

While I was working on this post, I starting thinking about how I could make the envelopes even more epic, without spending any extra money. The photo here is the result (so far). I'm still working out the kinks, so follow me on Instagram to see further developments!

I scanned a couple of pages out of an old copy of the book (shown open, above), glued a laser print to an envelope, then hit the edges and random spots with a spray stain (behaves much better than the spray ink, above, but I'd still follow the same steps). I recently found a small Xyron sticker maker in my craft room, so I printed a few images (labeled for reuse) onto photo paper, cut them out using postage-edge scissors, and ran them through the sticker maker. Viola! Faux postage. Inks used were black and dark gray.

Honorable mention, to show off the other Sleepy Hollow Special Delivery sticker. I didn't take a clear picture of it (alone) before mailing. All I used here was the road sign and the sticker, plus the vintage stamps.


And, of course, what started it all. As I mentioned in the Poe envelope post, many of my themes are inspired by the vintage postage stamps I have collected. The Legend of Sleepy Hollow stamp is a favorite (read more about it here) and its natural companion is Mr. Irving's stamp.

Sources
  • Free download of the short story from Project Gutenberg. I am a fan of reading original works (someday, I'll get through Frankenstein). This is a slice of Americana that has inspired much of what we know of Halloween, so it's good to know the origins! (Not surprising that Irving impacted my favorite holiday (Halloween), since he also kind of invented Christmas as we know it (repeat link).)
  • Interested in getting your own Sleepy Hollow envelopes to send? Contact me via the email link in my profile. I'm working on some ideas and it would help to know if anyone was interested.
  • Rubber Stamps
    • Horseman: Butter Side Down stamps (unmounted, cling-mounted or wood). They also have an Etsy store, where they sell just the wood-mounted stamps.  
    • Try Not to Lose Your Head & Road Sign: Impression Obsession - both are cling only. Linking each to the shop where I bought them. 
    • Bats: from a set by Momenta (gift from a friend)
    • Bird stamp: hand-carved gift from a pen pal.
    • Headstone: unknown, although I think it's from Rubber Baby Buggy Bumpers, which is out of business. Cemetery stamps are available from other sellers.
  • Inks: StazOn black, Ranger Archival in Jet Black & Watering Can (dark gray), Tsukineko's Memento in London Fog (medium gray). Spray ink is from Ranger's Dylusions line in Postbox Red. Spray stain is from Ranger's Distress line in Hickory Smoke. 
  • Misc:
    • May be Haunted sticker: Evil Supply Co. They also made the Sleepy Hollow Special Delivery stickers, but do not offer them in their shop at this time. 
    • Tape: This is Spinal Tape by Copernicus Toys (Amazon link). I already own this, so I use it, but it is pretty much crap. It doesn't stick to paper well & I have to add a layer of clear tape over it. 
    • Paper envelopes are from PaperSource (#10 & A9), document box was a re-use, poly envelope was from a bulk purchase.

Sunday, March 27, 2016

April is National Card and Letter Writing Month


Not to be confused with other letter-writing months, as far as I can tell, "National Card and Letter Writing Month" is an event created and sponsored by the US Postal Service. They even have a tie-in with Scholastic (it is fun, so check it out (PDF)).

Prior to 2001, the event was called National Letter Writing Week.

I recall events in school in the early-to-mid seventies that are reminiscent of the PDF linked above. We made post cards and our own postage stamps and pretended to mail them. In fact, I remember being pretty freaking impressed that people could just make their own stamps and glue them to a card or letter without spending any money. (I figured out the truth, eventually.)

In 1980, the USPS released a sheet of six different stamps (15¢) in honor of the week-long event. In 2001, they changed the duration of the event to one month. and in 2015, a new stamp was released (From Me to You (Forever)), that included extra stickers.  

Regardless of the event's origins, ending and receiving mail is a great way to feel good or bring warm feelings to others. Very few people get real mail nowadays. I'm not the birthday card sender I once was, but I have heard from some people in the past that the card I sent was the only one they received. And it really is just nice to get something personal in the mail. So, I encourage anyone reading this to set a goal and send some cheer.

It's also a great way to keep handwriting skills from going completely stagnant. (One of the reasons I started finding and writing to pen pals in the last year is because my handwriting was becoming illegible.)

I signed up for the Write_On challenge/campaign, which means I'm going to try and send thirty pieces of mail during the month. (Yikes!) I didn't do so well with the goal I set in February, but that's in the past. Each challenge is a fresh start, right? To keep track of my progress, I created a simple calendar/planner page (8½ x 11"), which I'm sharing below.

I'm also including some links to other events that might appeal. But you don't have to join anything. Set your own goal. Maybe it's to send some thank you notes, or "thinking of you" cards, or fun mail to your kids, nieces or nephews (bio or honorary). Connect, however it works for you.

Sources


Sunday, March 13, 2016

Decorated Envelopes - Poe and the Raven (Nevermore)

Since remounting and reorganizing all of my rubber stamps, I've felt compelled to use them more. Naturally, being me, I've also felt compelled to add to my collection, with one main goal in mind: to decorate my outgoing mail! Since I love themed mail, that's where I've been focusing my attention.

I decided to go kind of meta on some envelopes and include some vintage postage stamps from my collection in the theme. What ended up happening is that I started planning envelopes based on what postage stamps I could incorporate, and scouted out rubber stamps, etc. to fit the theme (it's just how my brain works). First up are some Edgar Allan Poe-themed mailings. I hope you enjoy! (See end of post for sources.)

[Disclaimer: none of this is necessary. The letter in the envelope is what counts, not what's on the envelope or, for that matter, the goodies inside. It's just another way to have fun with mail. I don't elaborately decorate every envelope, just some of them.]


To be honest, the first Poe/Raven envelopes didn't start out to be quite such a production! I found and ordered a Poe rubber stamp to go along with my postage stamps. I stamped it on white tissue paper, using a dark, solvent ink pad, mainly so I wouldn't waste envelopes if I messed up. That's when I discovered something that's probably common knowledge to other stampers: this ink was so dark that I could flip the paper over and use the mirror image. (Note: if you use this method, the ink will go all the way through the paper. I was luckily able to clean up my desk with alcohol swabs, but if I'd stamped on a different surface, I might have damaged it permanently. Next time, I'll have some scrap paper underneath!)

Poe facing left is a mirror image (back side of tissue paper).
I used modge podge to affix two of the images to envelopes, then decided that it needed more. I used some spray stains I have (that I still really haven't figured out how to use) to give the background some more detail. Should have done that first (which I did for the next two)! I then pulled out the small raven and "Nevermore" stamps that I had already planned to use, and also grabbed a new raven and candlestick and tried several variations. I tend to do "limited edition" runs, and quit at four.

But then... I realized that I had STUFF. I had some old recordings and put together a mini mixed CD. Ribbon became bookmarks, I split up a small sheet of raven stickers (only six to a pack) and, finally, remembered the Edgar Allan Poe bandages I had in my goody drawer. This is totally overkill, but it was so much fun to put together! Future envelopes will not be this extensive! (It was kind of exhausting. And, like I said, overkill.)

I will definitely not do the mini-CD again, since it appears that not many people have a drive that will accept them. It was fun, though, because it fit in the #10 envelope.

One last touch: I realized that if all of the little items ended up bunched together in the envelope, this could put the thickness into "package" territory once a letter was added. It's my goal to avoid this extra cost*, so I cut some thin cardboard (I save all of the sheets that come with postage stamps) to fit the envelope and taped all of the items to it. (It would also help protect the CD.) I also added a washi tape tab at the top of the card to help the recipient get it out of the envelope. I had to add an additional 22¢ stamp for the weight, not shown in bottom pics, but my goal of keeping it under the thickness restriction was met.

Later, I found a background rubber stamp with some of The Raven as text. I'm still experimenting with those, but they've been fun so far. The one pictured here went to the winner of the Halloween vintage postage stamps from a previous post.

*71¢ to 93¢ for a heavier envelope, but minimum $2.54 for any weight that exceeds the height/thickness limit. That's a pretty dramatic difference.

I recently posted a question on Instagram, asking my current pen pals to let me know if they would like (or wouldn't mind) getting Halloween-themed mail year 'round. I'm also sending out these little cards as letters go out. For any that say yes, I'm marking their page in my log accordingly. For those that are not interested, no worries. I have other ideas.

(l): normal stamped image; (r) reverse side of tissue paper
Sources

  • Ink for the tissue Poe & CD: StazOn black. Other stamped images: Ranger Archival in Jet Black.Block of text background (red envelope) used Ranger Archival in Watering Can. The spray stain is from Ranger's Distress.line.
  • Envelopes: The #10 gray envelopes are from Paper Source ("cement," being discontinued). The red envelope is from a random office supply store, left over from Xmas.
  • Sticker from Little B (technically a crow, but they're related)
  • Ribbon: sorry, can't give source. I bought it at a rubber stamp store in Northville, MI called Stampeddler Plus last fall.
  • Bandages: Archie McPhee (for added fun, I bought mine in Hell, MI)
  • Stamps


Wednesday, February 24, 2016

Vintage Postage Stamps Series: Halloween + a Giveaway!

February is the perfect time to write about Halloween-y postage stamps. At least it is for someone who loves all things creepy and eerie. I recently started reaching out to my pen pals to see who might want to get Halloween-themed envelopes (or letters) year 'round and immediately started in on decorating envelopes. My one (small) fear is that I'm going to run out of ideas and have to send plain envelopes come October. (I'll share some of those images in a follow-up post; this one is going to be long enough.)

As per usual with my vintage postage series, there's a giveaway (my best yet)! I hope you stay long enough to at least scan the post, but definitely check out the end for contest details.

As mentioned earlier, vintage Edgar Allan Poe stamps were the philately equivalent of a gateway drug and led me to start gathering/collecting postage stamps. I don't believe I've exhausted the theme, but I'm pretty ecstatic with what I've managed to gather. I have started spreading them out a bit, so I'll mix a couple of my spooky postage stamps with some modern ones, so I can make my "supplies" last longer. If you're interested in growing your own collection, check out my tips at the end of the first vintage postage post.

There are actually two Poe stamps: a 3¢ from 1949 and a 42¢ from 2009. The latter is pressure-sensitive (sticker-style), so it may not truly count as "vintage," but in my book, anything I can't buy at the PO right now qualifies. I like to use these together, with a modern, lower denomination stamp to round out the current rate.

If I was excited about the Poe stamps, I was over the moon when I discovered the brightly-colored 10¢ The Legend of Sleepy Hollow stamp (1974). I have a love/hate relationship with the original story by Washington Irving, but I love the imagery! It also has a sentimental significance, not to mention all of the works it has inspired. In addition to the stamp featuring Ichabod on the run from a headless horseman, there is a 1¢ stamp from 1940 featuring the author. This stamp has a little-known dual purpose: Mr. Irving sort of invented Christmas as we know it (in the US anyway), so you could use them on holiday cards in December.

The 32¢ pocket in my stamp notebook is the fattest because it has both Alfred Hitchcock (1998) & Classic Movie Monsters (1997), among others.

In addition to being a fan of such classics as The Birds, Psycho, The Lady Vanishes, etc., I introduced my goddaughter to Hitchcock movies when she was nine (Rear Window was her favorite for a long time). I put one of these stamps on almost every letter I send her (along with a Sleepy Hollow one), so I tend to hoard them. Note the sweet laser-cut profile in the upper left corner of the stamp.

The Movie Monster stamps are just so...well, they're the perfect Halloween stamp. I have done a Frankenstein's monster-themed envelope and am contemplating what I might do for the other three monsters in the set. I have a candelabra rubber stamp that might do for the Phantom; the Mummy & Dracula would probably be easier.

The Night Friends sheet (37¢, 2002) features four different American bats. These are just fun.

Honorable Mentions

  • Harry Potter series
  • Circus stamps (current Circus Posters (forever) or vintage (29¢,1993)): at least the damn clowns (I am actually not afraid of clowns*, but I recognize their potential as scary creatures and have totally used at least one clown stamp as part of a postage collage.) 
  • Carnivorous Plants (34¢, 2004).
  • Coming sometime in 2016, the USPS is releasing a Jack-o-lantern stamp, so there will be one more to add to the collection. 
  • You can always make your own
Outside the US? Canada still wins for its Haunted Canada series. I'm not sure what else is available - some countries have more fun than others with their stamps, but you might have to get creative when it comes to stretching the theme. 

Giveaway Time

One lucky commenter will win the 18 stamps pictured in the "giveaway" image, left. Anyone is eligible - even if you've won before - and I'll ship anywhere. There is at least one of each stamp mentioned in the main part of the story (plus one from the honorable mentions category (Carnivorous Plants)). Bonus: one of my custom (ghost) postage stamps that you cannot get anywhere else. All of the stamps are unused and unhinged (cannot guarantee mint condition), and can therefore be applied and included as part of any US postal rate.

To enter, simply comment here and tell me which of the above is your favorite OR suggest a themed stamp not included in the post. That is it!! I'll pick a winner on March 5th or 6th. Shares are not required, but will be rewarded if I'm aware that a winner shared the link. Important: make sure I have a way to reach you if you win!!

----------------
*Clown dolls are a whole 'nother story.


Wednesday, February 10, 2016

Why I Collect Postage Stamps & How I Organize Them

Or, the benefits of having postage stamps on hand
I struggled with how to title this. I want to explain what got me started gathering (not sure "collecting" is the right word) postage stamps and/or why I continue to do it. 

Marshmallows Feb. 2016
Basically, it's so I can do this (right, and below) without going to the post office or standing in any line. As long as I keep my packages from crossing the 13 oz. mark (I keep them close to 12 oz. to avoid any scale discrepancies), I can apply postage and drop the packages in any mail box. I order current stamps from the USPS site & get vintage stamps mainly from eBay. While the USPS charges for shipping, the fee is pretty reasonable and it's worth it to avoid the line or dealing with *that* clerk. You know the one.

What got me started? It began about 6 years ago. Like most people, I may have had half a book of stamps somewhere around the house, but needed to mail several small packages. I took my little stack of 4 or 5 envelopes, and got in line. Not one of those packages reached its destination. Not a single one. What was my crime? "Sassing" a crabby counter clerk. 

When it was my turn, the clerk proceeded to grill me about the contents of my packages (5½x8½" booklets in catalog-size envelopes). She went above and beyond the call of duty when it came to the Hazmat questions (fragile, liquid, perishable, etc.). I would usually say something like, "no, none of them," and that would be good enough, but not for her: she wanted me to tell her exactly what was in each envelope. I swear, I felt like I was crossing the border. 

They were identical, yet each time, she asked me what it contained. I finally said "it contains nothing fragile, liquid, perishable or anything else you've asked me. It's paper. It's all paper. They're all the same." (Something like that - it has been a few years!) She stopped asking, I paid, and went on my merry way. And the rest is history. Like I said above: none of those packages ever reached their intended recipients. That's quite a petty little tantrum, and I vowed to never let her touch my mail again. 

At first, I just would let whoever was behind me in line go ahead if her window was the next one open. Then, I discovered cool, old stamps like Edgar Allen Poe, movie monsters, etc. and went from there to finding that you could order larger denomination stamps* and have a variety of basic, modern stamps. I may have gotten a little carried away with my collection (see video, below), but now I can put any price together with what I have on hand and send packages to my heart's content (you can easily do this with just current stamps). I just go to the PO to check my box and only stand in line a few times a year to hand over boxes with a pre-paid label. And so far, none of my packages have gone astray. 

Important note for organization: The face value is not printed on the stamp for many denominations  over 20¢ . This is no big deal if you are using it the way they intend, using a stamp for a service (which is printed on the stamp), but if you're going to use them to make up a larger rate, a way to identify the actual face value is essential. I use a 3-ring binder and a LOT of labeled sheet protectors. If there is a rate change, these unmarked/forever stamps will need to be relabeled, but right now, I know that this stamp is worth 71¢ and this one is worth 93¢, etc. 

Here's a peek at my collection and how it's organized:


Last week, I stood in line for 10 minutes because I was out of the $1.20 Global stamps and needed to mail something sooner than a shipment could arrive. Ten minutes later, I learned that they were out of them, too (as is everyone else). Total waste of time! I also find that even the friendliest clerks get agitated when you go there with a list of denominations you need, especially if there is anyone waiting behind me. The website is easier to navigate, although it's still arranged pretty strangely (the $2 Inverted Jenny stamps are not listed with the over-49¢ stamps; they are only on the "sheets" page & don't come up in their search (I can't even link to them easily)). I sat down the other night and ordered the stamps I was out of and paid via PayPal without standing in line behind three people doing complex transactions (attempting to rent a PO box without ID, sending a package without tape, applying for a passport...), without leaving my desk, or anyone rolling their eyes at me or making huffing, impatient noises behind me. 

Want to do this yourself? (My recommendations.)
  • You need a scale that does partial ounces (in the US (I got mine at Harbor Freight); a digital kitchen scale might work)
  • Get a copy of the measurement card** with the thickness slot cut out (print it on cardstock & laminate if you can) Note: I can not find a valid link for these right now. Check the postage label for an upcoming post.
  • Use the "calculate price" function of the USPS site religiously. 
  • Use the print & ship function when your domestic package exceeds 13 oz. and take advantage of the discount. These packages come with free tracking and insurance up to $25 or $50.
  • Have a few padded envelopes (dollar store unless you can buy in bulk) and some clear tape at least. (Get good tape. Can't go wrong with Scotch or Ducktape.)
  • A calculator comes in handy, so you don't add more postage than you need (or put on too little), but my computer has one, as does my phone, and my tablet, so I'm covered there. 
  • Educate yourself about the rules. Some post office associates don't even know their own rules really well. You know there is a 22¢ surcharge (non-machinable) if your envelope is square, rigid or you addressed it sideways? Do you know that you don't have to pay that 22¢ for each condition, just once per envelope? So, a square, rigid envelope isn't 44¢ extra like I've been charged in the past. It's 22¢ extra (and there's a stamp in that amount just for that purpose). By knowing this and applying the postage myself, then dropping it into a box, I don't have to have that argument anymore.
  • Then buy a sheet each of the small denomination stamps, and whatever you can swing for the higher denominations. $9 will get you 20 each (1 sheet) of the: 1¢, 2¢, 3¢, 4¢, 5¢, 10¢ & 20¢ stamps. There are also 22¢ stamps (great for that extra handling) & 35¢ (domestic post cards, add-on for heavier letter), and so on. If you want to get into vintage stamps, read my "guide" at the end of this post. You can benefit from some of my early mistakes!
---------------------------
*I don't buy anything more expensive than the $2 denomination stamps. Anything that crosses the 13-oz mark qualifies for a discount if you print your own labels, so I do that, even if it's less fun. I stock up on anything I can get that is between 49¢ and $1 - they come in handy when you're putting together the $3.15 or $2.74 rates. 

**AKA Notice 3A.  I have a plastic version and it is very handy. I'm not sure where it came from, though. I don't know how much they cost, but this page says that they are available at Business Mail Entry Offices.

Tuesday, January 26, 2016

Reclaimed Postage Stamps Tutorial

This tutorial will show you how to reclaim non-canceled vintage (gummed) stamps from messed up envelopes (or for collage purposes).

Far too often, I mess up envelopes I'm planning to mail, or decide not to send something, so I definitely want to get those stamps back before the envelope goes in the trash! Because I order stamps via eBay a lot, I sometimes get cool stamps on packages that I might be able to use in a collage. Older, gummed stamps are far easier to reclaim than modern, pressure-sensitive (sticker) style stamps*; I have not had wonderful luck getting the sticker-style stamps off of paper, but have had amazing luck reclaiming vintage/gummed stamps.

This how-to is not for stamp collectors who put stamps into albums. You really want to find an expert (there are probably several on YouTube) who will demonstrate what tools, etc. to use. 

First, cut off the section containing the stamps (top pic). 

Cut out each stamp close to the edge without cutting the actual stamp. (If the stamps are still connected, you can leave them that way.)

Next, get a large, shallow bowl or dish and fill it with hot tap water. 

One by one, add your cut-apart stamps and tap them gently to submerge. Just do a few at a time - a little gumming may remain and you don't want them to stick together!

Wait a few seconds. It may take longer, but in the batch I did this morning, one stamp was floating free from its backing before I had added them all to the bowl.

Remove the stamps from the water with your fingers or tweezers and lay them on a paper towel. I usually set them out face up, flip them after about a minute (shown, right), then cover them with something lightweight & water-resistant to keep them flat (and safe from the cats' antics). 

When they're completely dry, put unused ones back (wherever you keep your stamps (I keep mine in a 3-ring binder, with one labeled sheet-protector for each denomination)) and toss the used ones into your ephemera collection.

When you're ready to use your reclaimed stamps, you'll need a good adhesive (I use Elmer's extra-strength office glue sticks; some craft glue sticks don't hold as well).

*Bonus pic, and a promise: I'll put together a tutorial showing how to retrieve modern, self-adhesive stamps from messed-up envelopes (or SASEs included in begging envelopes).

Update: done! See tutorial, here. 

Friday, January 1, 2016

Vintage Stamps Series: Space part 1, & another Giveaway!

Happy New Year! The closest I'm coming to making a resolution is a desire to post here more regularly and continue to learn new stuff. Maybe get off my ass some. But resolutions seem designed to make people feel bad about themselves and go buy gym memberships, so I avoid them.

I'm continuing the vintage stamp show-off series, and, to celebrate making it to 2016, giving away some stamps, too. Before we dig in, make sure you read to the end for giveaway details, and check out my first vintage stamps post for some tips for getting started.

Update: The Giveaway is over - the winner has been notified. 

I love myself some themes when it comes to stamps (wait until I share my Halloween-theme collection), and lately have been getting all the space-themed ones I could find (and justify the cost of). I've been wanting to show off my collection as it stands but have optimistically called this part 1 of the Space miniseries, because I hope there will be a part 2 (I'm missing several!).

I can never travel in space (claustrophobic, so the idea of being trapped in a small enclosure for any length of time...shudder), but I have been fascinated with it since my early days of watching Star Trek re-runs. One of my favorite books is The Moon is a Harsh Mistress, and I love old sci-fi movies, so fantastical/fictional imagery is fun, too. Here are the space-themed stamps I currently have, in no real order. I just re-read that and realized it sounds like I only care about fictional space. Not true. Not at all.

The 1981 Space Achievements (18¢) stamps were the first I acquired, starting with a pane of 8 tucked into a lot of loose stamps ordered from an eBay seller. They led me to start looking for other space-themed stamps.

I didn't think that these 1997 Space Discovery (32¢) stamps were real when I first saw them. I haven't done any reading on them, but the location is obviously Mars, so this fits in with my love of the fantastical and fictional, do you grok?
These 2000 Hubble (33¢) stamps are breathtaking. There are 5, with each row having a different order.

Here are a few random, loose examples:
  • 1948 3¢ Palomar Mountain Observatory
  • 1962 4¢ Project Mercury, honoring the John Glenn-piloted Mercury-Atlas 6 flight)
  • 1971 8¢ Space Achievement Decade (pictured here in reverse order)

    Below:
  • 1975 10¢ Mariner 10 (launched Nov. 1973 for a 2-yr mission to explore Venus & Mercury)
  • 1975 10¢ Pioneer (10 was launched in March 1972; 11 in April 1973)


Giveaway

Thanks for reading! I can't promise to always give away stamps when I do a vintage post, but I am this time! Winner will get the stamps in the image at top of this post (or to the right). All stamps are unused and unhinged, but not necessarily mint.

How to Enter: It's easy! Just comment here and share your favorite scientific or sci-fi work (any medium). Sharing is appreciated, but not required. I'd like to grow my readership, but I don't think that forcing people to repost and tag friends is a way to do it for real. The contest will end on January 15th. Make sure I can find you!!

Last time, only one person commented :-( , so this time, I'm hoping to DOUBLE that :-)

Thursday, November 19, 2015

Vintage Stamps Series: Girl Power part 1

This is what I hope to be the first in a series of posts sharing my vintage postage stamp collection. Up first are some of the stamps I'm classifying under "girl power" - stamps featuring strong female role models, both real and fictional. (Gee, I hope I'm not setting myself up by announcing a series, and multi-part topics!) On to the pictures! See accompanying text for more details. Read to the end for a mini giveaway!!

I think it was the Amelia Earhart stamp (1963) that got me going on the girl power category. I've seen them going for $1 each, but since I buy stamps to use, I searched until I found a full sheet at a more reasonable price per stamp.

I had a pretty shitty education, especially when it came to history, so I only learned about Sybil Ludington (1975) in the last few years. (You should definitely go read up on her, but in brief, at 16, she performed a ride similar to that of Paul Revere, only twice the distance.) Imagine my surprise when I stumbled across postage stamps in her honor! I had to buy them!!

I enjoy combining several stamps on an envelope, but am not always able to keep with a theme as wonderfully as shown on this page. This is a birthday card sent to a friend who participated in the Rosie the Riveter Guinness World Record a few weeks ago. Yes, I bought an entire sheet of stamps (Celebrating the Century, 1940s (1998)) for the Rosie stamp, but there were some other goodies on the sheet.

One thing you need to be prepared for when sending stamp collages is that the recipient won't notice. (Happened for the Rosie card, but then the recipient was inundated with birthday cards because she is beloved.) Update: birthday gal did notice. My bad.

This card hasn't been mailed yet, but I have already written a note on the back of the envelope ("check out the stamps!") and informed the recipient's father (my brother) to tell his kids (my niece & nephew to look at the stamps. I think niece will love the Prinecess Leia stamp (2007). Since the value is 41¢, an 8¢ Sybil stamp put it at the current 49¢ rate and continued the theme! (Nephew's card has a Luke stamp (they dressed as Leia & Luke when they were little and are still fans).)

This might be the best or the worst time to buy the 2007 Star Wars stamps. I had to be patient to find some that were reasonably priced (I have 1 sheet to save and 1 to use) - some sellers are charging exorbitant rates - but I'm so glad I got them.

Quick notes about gathering stamps for mailing (a little different from regular stamp collecting)

  • It's fun, but can be a little addictive. I recommend getting a 3-ring binder and a bunch of sheet protectors to help sort and protect your growing collection. In a future post, I'll share images of my set-up.
  • If you're shopping online (e.g. eBay), make doubly sure the listing says "unused" or something similar. MNH means "mint, never hinged," and that's usually what I go for, just to be safe. Hinged stamps are mailable but have to be separated from their hinges and I'm not up for that.
  • You can use any non-postmarked stamp issued by the USPS (can't tell you about other countries). I recommend a good glue stick in case the gummed ones don't want to stick to your envelope. (You cannot tape down stamps, except perhaps along an edge, but don't quote me there.)
  • A great way to start is with a "lot" like this one, which gives you enough stamps to mail 20 1-oz. letters for less than face value (FV). The challenge here, of course, is that you have no control over what you get, but the price is hard to beat and you have to start somewhere. I have no affiliation, except as a satisfied customer.
  • Don't feel like you must have a theme, or even use all vintage stamps. I have a sheet each of all the stamps currently available at the USPS in denominations up to 20¢, plus a few of some of the other values. Many people use one "spotlight" stamp and finish up with new stamps.
  • Use a calculator before you buy. I recently put together a spreadsheet to see what I paid per stamp v. the FV. I did pretty well a lot of the time, but my first few purchases were rather tragic. I was so excited to get Edgar Allen Poe stamps, for example, that I paid over $1 each (42¢ FV). I think I paid 20¢ each for some not-great quality 1¢ stamps (Washington Irving). 

What's this about a giveaway? [Update: we have a winner!]
To celebrate my second-ever commenter (LOL), I'm giving away some Girl Power stamps. There will be several of the Sybil stamps, some Amelias, and maybe some others, all unused (sadly, the Leia and Rosie stamps are not included). While I love and am slightly addicted to Instagram, I'm not requiring shares or tagging of unsuspecting friends. All I ask is that you comment, either here or on the IG post that brought you here, and tell me what you'd put on a postage stamp if you were in charge of the post office for a day. 

Open to anyone, anywhere, until Tuesday, 24 November, 2015. Please feel free to share, repost or tag, but it's not required. Make sure I have a way to contact you to get your snail mail addy if you win.

Sunday, November 8, 2015

When Good Envelopes Go Bad

That title might be a little extreme, but on Friday I did mail out some letters in envelopes I'm not terribly excited about or proud of. I keep buying new craft supplies and just play with them. Nothing wrong with that, in the least, but this time, maybe, I should have looked up some directions or something.

I hope my pen pals are still excited about getting letters, even though the envelopes are kind of hideous.

They didn't start out ugly. These are all PaperSource #10 envelopes in Curry. I just love deed-style envelopes (open on the short end) and theirs come in gorgeous colors and are nice and sturdy.

I got these spray inks and had a vision of lightly flecked colors across the edges of the envelopes. It's not quite how they turned out, but I just kept going, thinking I might end up with a tie-dye kind of thing. Not so much, but at least they're BRIGHT.

I added some washi tape here & there (mostly on the left edge that isn't shown above). Then I discovered that I didn't have a pen that really made the addresses stand out, so I had to use labels on a couple.

Basically, they're a hot mess that I hope actually arrive at their destinations. I also hope that the fun postage stamps and the letters will make up for the chaos on the outside.

There are too many individual stamps to list here, but you can always leave a comment if you want details.

"Let me know if you don't receive this" is one of my favorite rubber stamps to use for the first time I'm writing to someone. It's quirky and a little Discordian. Kind of like me.


I also received some mail! I had to cover most of the blue envelope, but my address was written in calligraphy and there are little flower stickers all over the back.

The big envelope is from someone with a way better & bigger rubber stamp collection than me! Seriously, @fairyartmother is a snail mail and mixed media artist that I was matched with for a swap recently and we agreed to continue exchanging letters. Gotta say, I get a kick out of being referred to as "the Mel..".

Thanks, pen pals, for bringing light to dreary days.