Pages

Thursday, June 23, 2016

Managing Your Mail, Part 1

Having trouble figuring out what's a letter and what's a package? Or why a fat letter that doesn't weight that much came back to you? I'm going to try to help!

Lately, I've been hearing a lot about people having mail returned to them, and struggling with the rules surrounding sending mail. I offered a couple of suggestions in an earlier blog post, Why I Collect Postage Stamps and How I Organize Them, but discovered yesterday that one of the links was broken. So I thought I'd do a series specifically about navigating the confusing and choppy waters of US Postal Service rules. Sometimes my mail takes its sweet time getting to its destination (most recently, it took 3 weeks for a letter to go ~50 miles), but as far as I know, they haven't arrived with postage due or come back to me..

Part 1 is just about the tools, because I don't want my focus to get buried (I have a tendency to ramble on). Part 2 will follow soon after, and will cover whatever else I can think of that might help.

This is going to be of more interest to individuals like me who would like to just drop their mail into a box whenever possible, and not stand in line for every little thing.

Recommended tools
  • Digital scale. In my opinion, this is an absolute necessity. You don't need a big scale to handle regular mail - a kitchen scale will do, as long as it displays partial ounces. (Fractions only matter after you cross the three-ounce mark. There is a 3.5 ounce rate, but otherwise, 1.1 ounce is the same as 2 ounces, and 2.1 ounces is the same as 3 ounces.) 
  • Bookmark the USPS price list (or print out the PDF (many pages)). The first section is a little grid that covers the basics of pricing letters and parcels. 
  • Bookmark the calculator. This will walk you through almost everything you need for domestic & international letters. The one thing you have to watch for is, just like at the counter, they start with the ridiculous options first and you have to dig for the regular first class costs.
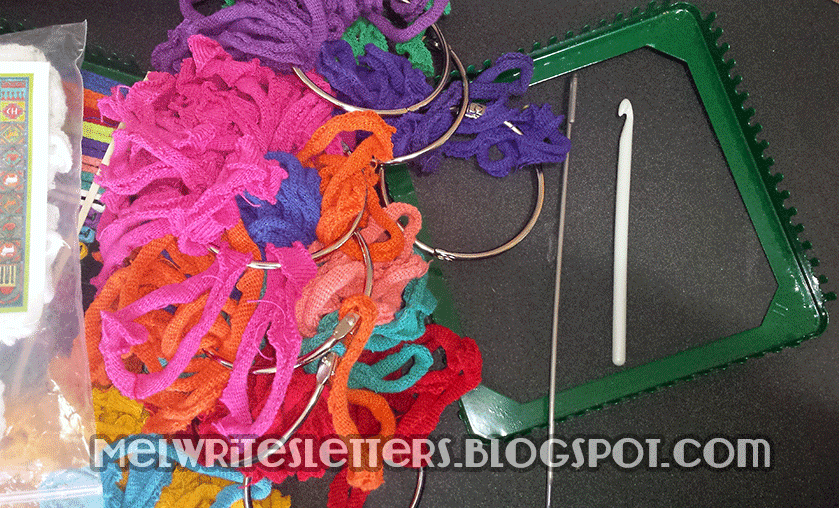
  • If you can get your hands on one, the Letter-size Mail Dimensional Standards Template (pictured above), aka Notice-3A (NOT3A) can be your best friend. I can't link to it, because all of the places I found for a printable one (legit & to scale) have been taken down. I'm not sure where mine came from, but I've had it for a couple of years and it's my buddy. It tells you at a glance if your envelope is too large to be considered a "letter." There's a slot in it: your envelope has to slide EASILY through the slot in order to go as a letter. If it sticks or doesn't fit, it jumps to package rates (a $2 difference for a 1 ounce envelope).
    • How to get one: 
      1. They are, I'm told, available at District Business Mail Entry offices. I don't know how that works, because mine is in Detroit, and even though I work in Detroit, I don't like driving around there (I get lost too easily). You might get lucky and find one nearby. 
      2. You can order them from USPS customer service, but be prepared. The person I spoke to wasn't aware that civilians could order them and it took a while to get it worked out. They don't take credit cards, so you have to get your order set up, then get the details for sending a check and all the info. to include with it. 
        • The item number is: 7610-03-000-9053 (NOT3A)
        • I recommend getting together with a group of local friends and ordering a bunch at once to save on shipping. 
      3. You can get one from me, temporarily. I was so aggravated by how difficult the USPS has made it for people to access basic tools, that I am ordering ten. I'm keeping a couple for myself - because I like redundancy with this kind of thing - and I'll make available the rest for whatever I paid ($1.60 each) plus actual shipping. I will not make a dime off of this, guaranteed. To get one of the eight, email me at mel.writes.letters at gmail dot com or DM me on Instagram. 
  • Tape measure, for large envelopes or parcels.
I hope this helps! Happy mailing!

Part 2 is already in progress, and covers what basic stamps you need, measurements, etc.

Thursday, June 2, 2016

Decorated Envelopes: Alfred Hitchcock

I haven't abandoned the blog, just been crazy-busy. Doing a quick lunchtime post today to share pics and resources of another fun envelope theme: Alfred Hitchcock. I started out combining two movies (Psycho and The Birds), but have since gathered enough great rubber stamps to focus on each movie separately. While The Birds is my favorite of the two movies, I prefer Psycho for envelope themes.

Note: envelopes are available (with postage) as custom orders through my Etsy shop.

On to the sources! Goodness, this was such a fun search. I've been looking for rubber stamps to do this theme for months!
  • Hitchcock vintage postage: eBay. (1998, 32¢, Scott #3226). See my buying vintage postage tips, here (end of post). You've probably noticed by now that my themes start with the postage. It's not essential, but a wonderful addition. 
  • Rubber stamps:
    • Mr. Hitchcock, standing, "Woman Screaming" (obviously Janet Leigh), and Hitchcock profile (not shown): Carmen Veranda. The website is fairly awful, but their service is good and these stamps are excellent quality! Luckily, they're all on the same page. 
    • House, Four Birds & Bird on Branch: Cherry Pie Art Stamps (don't forget to color in that one window with a yellow pencil!)
    • Curtain, left (also available in opposite direction) & Flock of Birds: 100 Proof Press
    • Butcher knife: Rubber Baby Buggy Bumpers (Out of Business (OOB) but I just spotted a similar one over at Leavonworth Jackson (direction flipped))
    • Light switch: neato stuff (OOB)
    • Small blood splatter: Hampton Arts - found a link for you at 123Stitch.com
    • Large blood splatter & blood spray: Inkadinkado Bloody Scene (love this set!)
  • Ink: London Fog, Gray Flannel, Tuxedo Black & Rhubarb Stalk, all from Tsuineko Memento
  • Envelopes: PaperSource.com
Just a brief word on tips and/or my process, since I've covered the topic multiple times in my decorated envelope series:

  • I'm a big fan of monochrome with a dash of color (often red), so I couldn't do these envelopes without a combination of gray and black inks. I prefer dye inks for easy clean-up.
  • The largest envelope you can mail without incurring extra postage costs (barring weight and thickness), is an A9. It easily holds 8½"x11" letter paper folded in half and gives you plenty of space for stamping. A7s are also great - they are the size that I sell (so I can mail them in an A9). Envelopes shown here are not to scale. 
  • Plan your layout a little. If you want to (or it looks like you might have to) overlap a stamp (see the curtain on the bottom right envelope, above), you should stamp the image that will be on top first, then mask it, so when you stamp the other image, it doesn't overlap (see top image - the knife was stamped first, then masked). Here's a link to a basic masking tutorial, but if you search for "rubber stamp masking technique" in any search engine, you should find what you need. No need to bother with masking for the blood splatter. That way lies madness. 
Next up: evil clowns or The Mummy? (I'm also working on The Wolf Man and Dracula themes, as well as The Thing from Another World.)

Sunday, April 17, 2016

My Etsy Shop has been reopened

I finally took the plunge and reopened my poor Etsy shop, after I got some stock together.

The shop is at stitchymel.etsy.com & you can get updates on Instagram account @epicmel.shop (there is already a coupon code* over there and I'll be putting together some kind of follower contest soon). To get started, I'm focusing on my love of snail mail, but may expand into other areas in the future.

I'm most excited about the note card packages. Since decorating the envelopes is my love, that's where I decided to focus, and naturally had to include coordinating vintage postage! Each envelope also comes with a flat note card with the option to have it blank or with a design stamped on it.

I only do these envelopes in limited runs. At this time, there are three each of four designs available. I'm working on some other ideas and don't know when I'll repeat the themes.

*I'm new to the coupon thing, so I messed up and put in a minimum ($9) when I meant it to be for any amount, but I'll refund the difference for smaller orders.

Tuesday, April 12, 2016

US Postal Rate Decrease Plus Reminder About Buying Stamps Online

In case you missed it, the US Postal Service has lowered the rate for mailing just about everything. Obviously, this means that it will cost less to buy certain stamps, which is a good thing, but it also means that stamps you paid more for are worth less now than they were on April 9th.

What it meant to me, however, was that all of the "forever-type" stamps - those without a denomination printed on them - had to be relabeled in my album so I didn't accidentally put too little postage on a letter and cause it to be returned or its recipient to pay postage due. This is going to be more relevant to people who combine postage to make up rates, like I enjoy doing. One envelope that I prepared over the weekend - with three Forever stamps on it - needed an extra 6¢ to make up for the change. (I had the new rate correct, but neglected to account for the change in the stamps' value.)

Anything with a denomination or face value (FV) printed on it will not be affected. A 10¢ stamp is still a 10¢ stamp. But anything that has "Forever" or a purpose on it has changed: Here is what was in my album that needed to be re-labeled, with the image I had in parenthesis. Check the USPS site for additional information.

  • Forever stamps were 49¢ and are now 47¢. 
  • The stamp for an additional ounce (or special handling fee (like for a square envelope)) was 22¢ & is now 21¢ (penguin).
  • Postcard stamps were 35¢ and are now 34¢ (coastal birds).
  • The stamp for square/non-machinable envelopes was 71¢ and is now 68¢ (yellow butterfly).
  • The 3-oz. letter stamp was 93¢ and is now 89¢ (Flannery O'Conner).
  • Global/International stamps were $1.20 and are now $1.15 (moon).
Buying Stamps Online?
I also wanted to throw out a caution to anyone who buys, or is thinking about buying, stamps on sites like eBay: Check the USPS site before you buy anywhere else! I am constantly seeing stamps that are still available in the USPS online shop being sold on eBay for 2 or more times their FV. A sheet of 1¢ stamps, for example, is a whopping 20¢ through the post office, but people are selling them for a couple of bucks. Why pay $2.50 for a $1 stamp or $4 for a $2 one? (The USPS also sells stamps on eBay, but for their actual face value, plus shipping.)

Pen Pal Log Update

Hello, friends. I'm going to do two posts, back-to-back rather than combine into one. First up is a quick update for the pen pal/mail log files I shared some time ago (part 1, part 2).

It's been a long time coming, but I finally got full-size (8½x11") pages done for the to-do list (letters to write) & mail log (individual pen pal sheet). Sorry it took so long!

I realize that the half-size log pages I shared previously might not be helpful for a lot of people. This size will be a lot more practical, and easier to implement, if you need such a thing. See links above for how I organize my log.

To Do list (letters to write)


Mail page (individual pen pal log sheet)

Monday, April 4, 2016

Reclaiming Stamps Tutorial 2 - Self-adhesive

Some weeks ago, in my first Free Stamps Tutorial, I shared how I went about reclaiming unused gummed (vintage) postage stamps if you mess up addressing an envelope. I promised to write up something for modern, self-adhesive stamps at some point in the future. Well, the future is here!!

Disclaimer: as always, I'm not an expert. I'm also not a "real" stamp collector, in that I'm generally interested in reclaiming unused stamps to put back in my collection, although I'm starting to use canceled stamps as part of collages. To separate stamps in order to store them in albums probably requires special steps and gloves or something like that, so if that's your goal, I advise seeking out advice from professionals. 

First, let me show you why you can't just use the soak-in-warm-water method for newer stamps. This was a stamp that I cut off one of my turquoise envelopes that I messed up.

Not only did some of the dye from the paper leach onto the stamp, if you look closely, you can see that it's wrinkled and messy. It is probably still usable, but certainly not pretty.

I tried a couple different methods with the stamps I had saved. None worked, so I had to wait until I had more stamps. I received an envelope with a stamp that I really wanted to keep and display (it was sent for that purpose), so I decided to try something besides the non-effective water methods and hit the search tools.

I landed on the American Philatelic Society's Tips and Links page, and followed the link in the "Soaking Self-Adhesives" section to a PDF about the magic of  removing self-adhesive stamps from envelopes. I recommend that you read the article, but here is my experience.

Materials: The article recommends one of two products: an adhesive remover called "Bestine," which I could not find locally, or a 100% natural citrus oil product. I was able to find "Pure Citrus," the exact product recommended, in the air freshener section at Home Depot for $4.97, so I'm basing this entry on using that. You want one labeled 100% natural, containing just orange oil. (OdoBan makes an air freshener/adhesive remover (right on the label) that's 99.5% natural and costs $1 or so less. It may be perfectly fine, but I went with the 100%.)

In addition to the Pure Citrus, you need some paper towels and cotton swabs. I suggest having a piece of parchment paper handy as well.

Instructions
  1. For plain paper envelopes*, cut out the stamp, leaving a little border of paper. 
  2. Spray a little of the oil into a small dish (disposable plastic cup, etc., is great, but regular dishes will wash up fine with soap & hot water). 
  3. Put the stamp face down on a couple of layers of folded paper toweling.
  4. Dip one of the swabs into the oil and rub it over the paper until it's lightly saturated. Wait a few seconds. The stamp should easily peel away from the paper. If it doesn't, just add a little more, wait, then try again. You can also spray directly onto the back of the piece, but when I did it in a dish, the next stamp was saturated (it's fine, but I wanted to avoid that). 
  5. There will be some adhesive remaining on the stamp. The article suggests rubbing a little talc on it, but we didn't have any, so I took another swab with a little oil on it, and gently rubbed the back of the stamp. Most or all of the adhesive came away.
  6. Let it air dry for a few minutes, then store in a folded piece of parchment, keeping the stamps separate. After a while, you'll know if any adhesive remains and you can store those stamps in a glassine envelope or folded parchment paper until ready to glue onto envelopes and use.**
*If the envelope is thick, you can work on the stamp where it is, face-up, but slowly. Don't soak the whole thing, just wet an edge with the oil, get the edge up, then gently rub the swab between the stamp and paper, pushing towards where they meet, peeling slowly until it comes away. Then, follow steps 5 & 6, above.

**If the stamps are from another country, you can always keep them just to look at if they're awesome - like this one - or share with a collector.

Seriously, isn't this stamp awesome?! I couldn't tell until I saw it close up that they were indoors, in a blanket fort, which is even cooler than outdoors in a tent, which is what I originally thought. Because I've decided that this older child is reading a ghost story to the younger one, it's going to look wonderful next to my Haunted Canada stamps...as soon as I figure out how and where to display them! They're really about storytelling and pretend, but hey, I used my imagination to create a back story!

The little flecks are from the envelope, which was very heavy-duty, with a gold foil pattern. 


Wednesday, March 30, 2016

Decorated Envelopes - Legend of Sleepy Hollow

The Legend of Sleepy Hollow had a place in my heart long before I read the original short story by Washington Irving. I was probably introduced to the story via an installment in the Trixie Belden mystery series (#26, The Mystery of the Headless Horseman (1979)), but it has been referred to so much, and adapted so often, that I really can't pinpoint my first exposure.

I do know that I didn't actually read the real thing until three or four years ago. I think I must have whizzed through it, because I would have told you that, while it was a well-told tale, it was not actually that spooky; however, a second read-through is proving me wrong. This time, I slowed down to let Mr. Irving set the scene, and found that if you remember that all of these things are happening in a creepy place that everyone believes is haunted, it's way better (and more fun).

My goddaughter and I share an old connection related to the book, which is the main reason I started compiling materials to create Sleepy Hollow mail. Writing this post has encouraged me to a) watch the film Sleepy Hollow, which I love, and b) re-read the story. While I do that, here are some recent images of Sleepy Hollow mail, with comments. I'll list all sources at the end.

Stamping on poly envelopes is tough, but not impossible. You need a "sticky," permanent ink (I used StazOn) and some patience, because you need to take it slowly and lift your stamp straight up, then wait for the ink to dry.

These are the three main stamps I have for the Sleepy Hollow theme. I'm on the lookout for more, but some of the usual Halloween favorites can be put into play (bats, jack-o-lanterns), plus anything that would be woodsy - trees, birds, etc.

Whenever possible, I like to send "haunted mail," and this sticker is a great addition (see sources).

My first Sleepy Hollow envelope, shown with a hoarded sticker. (One of my pen pals sent me two - I have used one. Since they don't seem to be available, I'm going to work on creating my own.)

I love the lighter gray envelopes for the themed mail because it's already gloomy (white is so stark). On this, I used a fine mist of red spray ink, and medium gray and black stamp pads.

To use the spray ink, get a deep cardboard box and hold the spray bottle as far away from the envelope as you can. Be prepared to try a few times (one pump should do it). This stuff can be pretty nasty if sprayed anywhere else - it was damn hard to get off my fingers - so take care!

While I was working on this post, I starting thinking about how I could make the envelopes even more epic, without spending any extra money. The photo here is the result (so far). I'm still working out the kinks, so follow me on Instagram to see further developments!

I scanned a couple of pages out of an old copy of the book (shown open, above), glued a laser print to an envelope, then hit the edges and random spots with a spray stain (behaves much better than the spray ink, above, but I'd still follow the same steps). I recently found a small Xyron sticker maker in my craft room, so I printed a few images (labeled for reuse) onto photo paper, cut them out using postage-edge scissors, and ran them through the sticker maker. Viola! Faux postage. Inks used were black and dark gray.

Honorable mention, to show off the other Sleepy Hollow Special Delivery sticker. I didn't take a clear picture of it (alone) before mailing. All I used here was the road sign and the sticker, plus the vintage stamps.


And, of course, what started it all. As I mentioned in the Poe envelope post, many of my themes are inspired by the vintage postage stamps I have collected. The Legend of Sleepy Hollow stamp is a favorite (read more about it here) and its natural companion is Mr. Irving's stamp.

Sources
  • Free download of the short story from Project Gutenberg. I am a fan of reading original works (someday, I'll get through Frankenstein). This is a slice of Americana that has inspired much of what we know of Halloween, so it's good to know the origins! (Not surprising that Irving impacted my favorite holiday (Halloween), since he also kind of invented Christmas as we know it (repeat link).)
  • Interested in getting your own Sleepy Hollow envelopes to send? Contact me via the email link in my profile. I'm working on some ideas and it would help to know if anyone was interested.
  • Rubber Stamps
    • Horseman: Butter Side Down stamps (unmounted, cling-mounted or wood). They also have an Etsy store, where they sell just the wood-mounted stamps.  
    • Try Not to Lose Your Head & Road Sign: Impression Obsession - both are cling only. Linking each to the shop where I bought them. 
    • Bats: from a set by Momenta (gift from a friend)
    • Bird stamp: hand-carved gift from a pen pal.
    • Headstone: unknown, although I think it's from Rubber Baby Buggy Bumpers, which is out of business. Cemetery stamps are available from other sellers.
  • Inks: StazOn black, Ranger Archival in Jet Black & Watering Can (dark gray), Tsukineko's Memento in London Fog (medium gray). Spray ink is from Ranger's Dylusions line in Postbox Red. Spray stain is from Ranger's Distress line in Hickory Smoke. 
  • Misc:
    • May be Haunted sticker: Evil Supply Co. They also made the Sleepy Hollow Special Delivery stickers, but do not offer them in their shop at this time. 
    • Tape: This is Spinal Tape by Copernicus Toys (Amazon link). I already own this, so I use it, but it is pretty much crap. It doesn't stick to paper well & I have to add a layer of clear tape over it. 
    • Paper envelopes are from PaperSource (#10 & A9), document box was a re-use, poly envelope was from a bulk purchase.

Monday, March 28, 2016

Potholder Looms - Practical Nostalgia

Rediscover an old friend. Frenemy?

I don't know about you, but there are many times where I will go to take a pan out of the oven and cannot find a potholder. It still happens, but I've greatly reduced the frequency of the event by adding many potholders to our inventory. (I also have figured out where they all go, so I can track them down, but that's another story.)

Did you have a potholder loom when you were a kid? I did, or at least I got to use one. I do know that I never finished a single potholder. The kit I used came with stretchy nylon loops and no tools and I got so frustrated with it that I quit without finishing even one (I was also an uncoordinated child).

There were (and are) kits available with thick cotton loops, metal frames and tools to help you weave and finish. I bought one of these for myself a couple of years ago, and have had such fun with it!!

In this post, I'm going to share my love of this back-to-basics craft. I'll share my "system," provide links to kits/tools and (bonus!) I have a 12-card set of "recipe" cards (patterns) for you do download and print! I'm going to focus on the traditional loom, but will include some other options at the end.

I have actually given these as gifts, but the reception was mixed. You really have to know your audience, I guess. Personally, I love them. They are thick enough to handle just about any pan, dish, etc. Because they are cotton, they won't melt and can also serve as trivets. What's really fun is the variety of patterns you can create. Once you start getting near the end of your supply, the options obviously change, but they're still fun and functional, even if they aren't my favorite color (I never get enough of the bright, light green loops!).

See the source list for a free download of twelve different patterns, including all those shown in the post. (My favorites are the two at the bottom right, "Quattro" & "Color Gamp.")


Essentials: the basic kit I purchased comes with a metal frame, a plastic crochet hook, a long metal weaving hook and a bunch of cotton loops in a variety of colors.

I cannot recommend the Harrisville Designs kits highly enough (see sources). They are sturdy, come with everything you need, and are available in two sizes: the regular traditional kit makes two ~6" potholders and the deluxe traditional kit makes six ~6" potholders. (They also have a PRO size, which I'll talk about at the end of this post.) The sell bags of loops in variety packs or individual colors, so you can do whatever you want. (At this time, I have no affiliations; this is an unsolicited rave review of a regular customer.)

I don't really recommend the Klutz Potholders book & kit. The plastic loom is the same size as the metal ones above, and it comes with a crochet hook, but the loops are a nylon/cotton blend (resulting in a smaller potholder) and there is no weaving hook. As for the pattern book (why I bought it)...there's nothing in there that you can't find online (weaving patterns, projects to make out of squares, that kind of thing). However, if you already have one, play with it!! The stretchy loops are easy to work with and the end result is fine for most kitchen duties. You just need to come up with a long hook that will help you pull the loops through. Since I have the kit, I'll probably make more in the future, and will post images on Instagram, so if you're interested, follow me there. I may do an update blog post, because I'm going to try regular weaving, but I'm not sure when that will happen.

Extras: I have added a few things to my potholder kit that I personally find to be essential, but are listed here as extras.
  • Shown above, I found a bunch of large 2" & 3"book rings that I use to keep the colors separated. This makes it really easy for me to see that I have a ton of one color left, and just a few of others, and I pick my pattern accordingly. 
  • Rubber bands: the closer you get to the end of your weaving, the more the loops like to pop off of the pegs. I'll share a picture further down that shows how I use these to keep my work together. 
  • Sturdy, ergonomic crochet hook: Crochet and I are not friends, so an ergonomic hook helps us stay civil. 
  • Patterns. Download mine, below, or check out Harrisville Design's Pattern Wizard (make sure to switch to "Traditional"). Of course, you can design your own, or just wing it with lovely randomness.
Tips & Tricks
I'm not going to reinvent the wheel and write up a how-to, since every kit comes with directions, but I will share some things that have helped me keep this activity fun.

Storage: I'm a big fan of having the right container/bag for projects and this is no exception. I picked up this square fabric basket-type thing at a HomeGoods store. It fits great in a square storage cubby shelf and I always know where everything is. 

Load your Wrist: If you're following a pattern, spend a few minutes before starting and count out the loops you need, then pile them onto your wrists (only showing on one here so I could take the picture). 

Rubber bands: I use thick rubber bands to keep the loops on the pegs. This technique has saved my sanity! You can use one around each side, or (shown), secure a few at a time on two sides. (You just have to avoid grabbing a band with your weaving hook as you go, but it's not been an issue for me.) As you finish, move or remove the bands
Finishing & the last loop: Okay, I have to admit that I have never figured out how to finish these without a loop at the end, but since I don't mind the loop, I don't worry about it too much. What I do is start at any corner, then use the crochet hook all the way around until I get to the last two loops. I put the hook through the two loops and pull another free loop (doubled) through those two. Then I pull one end of the new doubled loop through its other end and tug. Tadah! Loop. Maybe someday, someone can teach me how to do it another way. 


Other Looms
Traditional (top) vs. PRO loom

  • I recently read an article (in Craftsanity issue 6) about making your own looms, as well as weaving with yarn. I haven't tried it yet, but would like to. 
  • Harrisville Designs also makes a PRO-size potholder loom. I received one for Giftmas last year, along with extra loops. Since they're larger, they require larger loops, and more of them, so naturally they cost more to make, but seems to be in scale with the cost of the traditional loops. I will say that the larger potholders are pretty epic (seen here with a traditional size on top), but the overall cost is high, especially if you want one of the color kits. Having said that, I'd love to get my hands on the big bag of loops they sell (5 lbs., $90, traditional makes 50 potholders, PRO makes 25). ::drools::


Sources


Sunday, March 27, 2016

April is National Card and Letter Writing Month


Not to be confused with other letter-writing months, as far as I can tell, "National Card and Letter Writing Month" is an event created and sponsored by the US Postal Service. They even have a tie-in with Scholastic (it is fun, so check it out (PDF)).

Prior to 2001, the event was called National Letter Writing Week.

I recall events in school in the early-to-mid seventies that are reminiscent of the PDF linked above. We made post cards and our own postage stamps and pretended to mail them. In fact, I remember being pretty freaking impressed that people could just make their own stamps and glue them to a card or letter without spending any money. (I figured out the truth, eventually.)

In 1980, the USPS released a sheet of six different stamps (15¢) in honor of the week-long event. In 2001, they changed the duration of the event to one month. and in 2015, a new stamp was released (From Me to You (Forever)), that included extra stickers.  

Regardless of the event's origins, ending and receiving mail is a great way to feel good or bring warm feelings to others. Very few people get real mail nowadays. I'm not the birthday card sender I once was, but I have heard from some people in the past that the card I sent was the only one they received. And it really is just nice to get something personal in the mail. So, I encourage anyone reading this to set a goal and send some cheer.

It's also a great way to keep handwriting skills from going completely stagnant. (One of the reasons I started finding and writing to pen pals in the last year is because my handwriting was becoming illegible.)

I signed up for the Write_On challenge/campaign, which means I'm going to try and send thirty pieces of mail during the month. (Yikes!) I didn't do so well with the goal I set in February, but that's in the past. Each challenge is a fresh start, right? To keep track of my progress, I created a simple calendar/planner page (8½ x 11"), which I'm sharing below.

I'm also including some links to other events that might appeal. But you don't have to join anything. Set your own goal. Maybe it's to send some thank you notes, or "thinking of you" cards, or fun mail to your kids, nieces or nephews (bio or honorary). Connect, however it works for you.

Sources


Sunday, March 13, 2016

Decorated Envelopes - Poe and the Raven (Nevermore)

Since remounting and reorganizing all of my rubber stamps, I've felt compelled to use them more. Naturally, being me, I've also felt compelled to add to my collection, with one main goal in mind: to decorate my outgoing mail! Since I love themed mail, that's where I've been focusing my attention.

I decided to go kind of meta on some envelopes and include some vintage postage stamps from my collection in the theme. What ended up happening is that I started planning envelopes based on what postage stamps I could incorporate, and scouted out rubber stamps, etc. to fit the theme (it's just how my brain works). First up are some Edgar Allan Poe-themed mailings. I hope you enjoy! (See end of post for sources.)

[Disclaimer: none of this is necessary. The letter in the envelope is what counts, not what's on the envelope or, for that matter, the goodies inside. It's just another way to have fun with mail. I don't elaborately decorate every envelope, just some of them.]


To be honest, the first Poe/Raven envelopes didn't start out to be quite such a production! I found and ordered a Poe rubber stamp to go along with my postage stamps. I stamped it on white tissue paper, using a dark, solvent ink pad, mainly so I wouldn't waste envelopes if I messed up. That's when I discovered something that's probably common knowledge to other stampers: this ink was so dark that I could flip the paper over and use the mirror image. (Note: if you use this method, the ink will go all the way through the paper. I was luckily able to clean up my desk with alcohol swabs, but if I'd stamped on a different surface, I might have damaged it permanently. Next time, I'll have some scrap paper underneath!)

Poe facing left is a mirror image (back side of tissue paper).
I used modge podge to affix two of the images to envelopes, then decided that it needed more. I used some spray stains I have (that I still really haven't figured out how to use) to give the background some more detail. Should have done that first (which I did for the next two)! I then pulled out the small raven and "Nevermore" stamps that I had already planned to use, and also grabbed a new raven and candlestick and tried several variations. I tend to do "limited edition" runs, and quit at four.

But then... I realized that I had STUFF. I had some old recordings and put together a mini mixed CD. Ribbon became bookmarks, I split up a small sheet of raven stickers (only six to a pack) and, finally, remembered the Edgar Allan Poe bandages I had in my goody drawer. This is totally overkill, but it was so much fun to put together! Future envelopes will not be this extensive! (It was kind of exhausting. And, like I said, overkill.)

I will definitely not do the mini-CD again, since it appears that not many people have a drive that will accept them. It was fun, though, because it fit in the #10 envelope.

One last touch: I realized that if all of the little items ended up bunched together in the envelope, this could put the thickness into "package" territory once a letter was added. It's my goal to avoid this extra cost*, so I cut some thin cardboard (I save all of the sheets that come with postage stamps) to fit the envelope and taped all of the items to it. (It would also help protect the CD.) I also added a washi tape tab at the top of the card to help the recipient get it out of the envelope. I had to add an additional 22¢ stamp for the weight, not shown in bottom pics, but my goal of keeping it under the thickness restriction was met.

Later, I found a background rubber stamp with some of The Raven as text. I'm still experimenting with those, but they've been fun so far. The one pictured here went to the winner of the Halloween vintage postage stamps from a previous post.

*71¢ to 93¢ for a heavier envelope, but minimum $2.54 for any weight that exceeds the height/thickness limit. That's a pretty dramatic difference.

I recently posted a question on Instagram, asking my current pen pals to let me know if they would like (or wouldn't mind) getting Halloween-themed mail year 'round. I'm also sending out these little cards as letters go out. For any that say yes, I'm marking their page in my log accordingly. For those that are not interested, no worries. I have other ideas.

(l): normal stamped image; (r) reverse side of tissue paper
Sources

  • Ink for the tissue Poe & CD: StazOn black. Other stamped images: Ranger Archival in Jet Black.Block of text background (red envelope) used Ranger Archival in Watering Can. The spray stain is from Ranger's Distress.line.
  • Envelopes: The #10 gray envelopes are from Paper Source ("cement," being discontinued). The red envelope is from a random office supply store, left over from Xmas.
  • Sticker from Little B (technically a crow, but they're related)
  • Ribbon: sorry, can't give source. I bought it at a rubber stamp store in Northville, MI called Stampeddler Plus last fall.
  • Bandages: Archie McPhee (for added fun, I bought mine in Hell, MI)
  • Stamps


Sunday, March 6, 2016

Custom Sticky Notes

We live in a digital world, but just about everyone still has occasion to jot down some thoughts or leave a note. For those of us who are letter writers, we can probably think of many uses for sticky notes and several for customized ones.

Here's an easy DIY project for you: sticky notes that you can customize or personalize to your heart's content.

I've been making my own personalized sticky notes for some time. They are inexpensive (compared to having them printed) and can be highly customized. I wasn't a huge fan of the templates I started out using, so I made my own, which I'm sharing today (8½x11" only right now -- I can do A4 if there is interest). The only drawback would be for anyone bothered by the virtual impossibility of having them in a perfectly square stack (see image).

What do you need?
  • My templates (or make your own**). The PDF is the layout copy (with printed grid lines). The Word doc is the print copy (without printed grid lines) that you can customize to include your own text or art.
  • 3x3" sticky notes If you want a different size note, see the details at the end of this post** to see how to make your own guides. (I'm avoiding naming brands in general, but I really do recommend Post-it notes: you want these to STICK during printing; I wouldn't trust dollar store notes in my printer.)
  • Inkjet printer (I recommend printing the actual notes on an ink-jet printer, just to be on the safe side. The layout sheets can be printed on any kind of printer).
  • MS Word (Open Office Writer should also work okay)
  • Artwork (clipart, logo, etc.), or you can just type some text. To show that you don't need fancy software, I made my "logo" (above) in PowerPoint and saved it as an image. 

How to make your own custom sticky notes: 
  1. If you have access to a copier, print one copy of the layout document, decide which will be your top edge* and mark it. Then make as many copies as you like (each will produce six notes).
    If you don't have access to a copier, print as many copies of the layout document as you like, then mark the top on each page*. 
  2. Apply sticky notes to the squares on the layout, with the sticky edge towards the designated top edge (any other way might lead to paper jams).
  3. On your computer, add your details to the print version, making sure to rotate them so they'll be aligned to the real top edge of your note*. These guides are just a table and are not locked, so if you want text (e.g. "from the desk of...") at the bottom, consider using a text box instead of hitting [Enter] a bunch of times. The fun part is that you can do up to six different versions in one go, with different images, text, etc. 
  4. Print this version onto the layouts that you've applied the notes to, making sure the top of the layout sheet is pointing in the right direction for your printer*.
  5. Peel notes off of the layouts and stack as best as possible.

* My old printer fed paper at the short edge, so I marked the actual top of the page as the TOP and aligned my notes accordingly. My current printer tray feeds pages along the long edge. so next time, I'll have to make one of the long edges the top to avoid jams. This makes things more complicated, because I will also have to remember to rotate the content in the grid so they'll be in the right place on the printed notes. I actually ran some tests through the old way and they were fine, but your mileage may vary. As always, I'm not an expert and cannot accept any responsibility for issues that arise with equipment I've never seen.

I may do a rotated version for printers like mine.

** All you need to do is create two almost identical versions of a document with the correctly-sized grids. On the layout version, the grid lines will print so you can align your notes. On the print version, the grid lines should NOT print. Only what you add to the spaces intended for your notes will print.


Wednesday, March 2, 2016

Marshmallow Woes

Looks like it's back to the drawing board for marshmallow perfection. The batch of red hots marshmallows I wrote about a couple of weeks ago was perfection. Two weeks later, they were still excellent. I made two batches over the weekend - vanilla & red hot (again) - and things did not go as well this time. No pics because it's hard to convey in pictures. The vanilla ones were edible, but not great. The cinnamon ones were awful. I followed the same steps, or so I thought, but there was a dreadful imbalance, perhaps with the amount of water with the gelatin? Anyway, I've ordered an entire book of recipes with lots of front matter and marshmallow logic. Hopefully, I'll have something to report again in the near future.

Wednesday, February 24, 2016

Vintage Postage Stamps Series: Halloween + a Giveaway!

February is the perfect time to write about Halloween-y postage stamps. At least it is for someone who loves all things creepy and eerie. I recently started reaching out to my pen pals to see who might want to get Halloween-themed envelopes (or letters) year 'round and immediately started in on decorating envelopes. My one (small) fear is that I'm going to run out of ideas and have to send plain envelopes come October. (I'll share some of those images in a follow-up post; this one is going to be long enough.)

As per usual with my vintage postage series, there's a giveaway (my best yet)! I hope you stay long enough to at least scan the post, but definitely check out the end for contest details.

As mentioned earlier, vintage Edgar Allan Poe stamps were the philately equivalent of a gateway drug and led me to start gathering/collecting postage stamps. I don't believe I've exhausted the theme, but I'm pretty ecstatic with what I've managed to gather. I have started spreading them out a bit, so I'll mix a couple of my spooky postage stamps with some modern ones, so I can make my "supplies" last longer. If you're interested in growing your own collection, check out my tips at the end of the first vintage postage post.

There are actually two Poe stamps: a 3¢ from 1949 and a 42¢ from 2009. The latter is pressure-sensitive (sticker-style), so it may not truly count as "vintage," but in my book, anything I can't buy at the PO right now qualifies. I like to use these together, with a modern, lower denomination stamp to round out the current rate.

If I was excited about the Poe stamps, I was over the moon when I discovered the brightly-colored 10¢ The Legend of Sleepy Hollow stamp (1974). I have a love/hate relationship with the original story by Washington Irving, but I love the imagery! It also has a sentimental significance, not to mention all of the works it has inspired. In addition to the stamp featuring Ichabod on the run from a headless horseman, there is a 1¢ stamp from 1940 featuring the author. This stamp has a little-known dual purpose: Mr. Irving sort of invented Christmas as we know it (in the US anyway), so you could use them on holiday cards in December.

The 32¢ pocket in my stamp notebook is the fattest because it has both Alfred Hitchcock (1998) & Classic Movie Monsters (1997), among others.

In addition to being a fan of such classics as The Birds, Psycho, The Lady Vanishes, etc., I introduced my goddaughter to Hitchcock movies when she was nine (Rear Window was her favorite for a long time). I put one of these stamps on almost every letter I send her (along with a Sleepy Hollow one), so I tend to hoard them. Note the sweet laser-cut profile in the upper left corner of the stamp.

The Movie Monster stamps are just so...well, they're the perfect Halloween stamp. I have done a Frankenstein's monster-themed envelope and am contemplating what I might do for the other three monsters in the set. I have a candelabra rubber stamp that might do for the Phantom; the Mummy & Dracula would probably be easier.

The Night Friends sheet (37¢, 2002) features four different American bats. These are just fun.

Honorable Mentions

  • Harry Potter series
  • Circus stamps (current Circus Posters (forever) or vintage (29¢,1993)): at least the damn clowns (I am actually not afraid of clowns*, but I recognize their potential as scary creatures and have totally used at least one clown stamp as part of a postage collage.) 
  • Carnivorous Plants (34¢, 2004).
  • Coming sometime in 2016, the USPS is releasing a Jack-o-lantern stamp, so there will be one more to add to the collection. 
  • You can always make your own
Outside the US? Canada still wins for its Haunted Canada series. I'm not sure what else is available - some countries have more fun than others with their stamps, but you might have to get creative when it comes to stretching the theme. 

Giveaway Time

One lucky commenter will win the 18 stamps pictured in the "giveaway" image, left. Anyone is eligible - even if you've won before - and I'll ship anywhere. There is at least one of each stamp mentioned in the main part of the story (plus one from the honorable mentions category (Carnivorous Plants)). Bonus: one of my custom (ghost) postage stamps that you cannot get anywhere else. All of the stamps are unused and unhinged (cannot guarantee mint condition), and can therefore be applied and included as part of any US postal rate.

To enter, simply comment here and tell me which of the above is your favorite OR suggest a themed stamp not included in the post. That is it!! I'll pick a winner on March 5th or 6th. Shares are not required, but will be rewarded if I'm aware that a winner shared the link. Important: make sure I have a way to reach you if you win!!

----------------
*Clown dolls are a whole 'nother story.