Pages

Monday, March 28, 2016

Potholder Looms - Practical Nostalgia

Rediscover an old friend. Frenemy?

I don't know about you, but there are many times where I will go to take a pan out of the oven and cannot find a potholder. It still happens, but I've greatly reduced the frequency of the event by adding many potholders to our inventory. (I also have figured out where they all go, so I can track them down, but that's another story.)

Did you have a potholder loom when you were a kid? I did, or at least I got to use one. I do know that I never finished a single potholder. The kit I used came with stretchy nylon loops and no tools and I got so frustrated with it that I quit without finishing even one (I was also an uncoordinated child).

There were (and are) kits available with thick cotton loops, metal frames and tools to help you weave and finish. I bought one of these for myself a couple of years ago, and have had such fun with it!!

In this post, I'm going to share my love of this back-to-basics craft. I'll share my "system," provide links to kits/tools and (bonus!) I have a 12-card set of "recipe" cards (patterns) for you do download and print! I'm going to focus on the traditional loom, but will include some other options at the end.

I have actually given these as gifts, but the reception was mixed. You really have to know your audience, I guess. Personally, I love them. They are thick enough to handle just about any pan, dish, etc. Because they are cotton, they won't melt and can also serve as trivets. What's really fun is the variety of patterns you can create. Once you start getting near the end of your supply, the options obviously change, but they're still fun and functional, even if they aren't my favorite color (I never get enough of the bright, light green loops!).

See the source list for a free download of twelve different patterns, including all those shown in the post. (My favorites are the two at the bottom right, "Quattro" & "Color Gamp.")
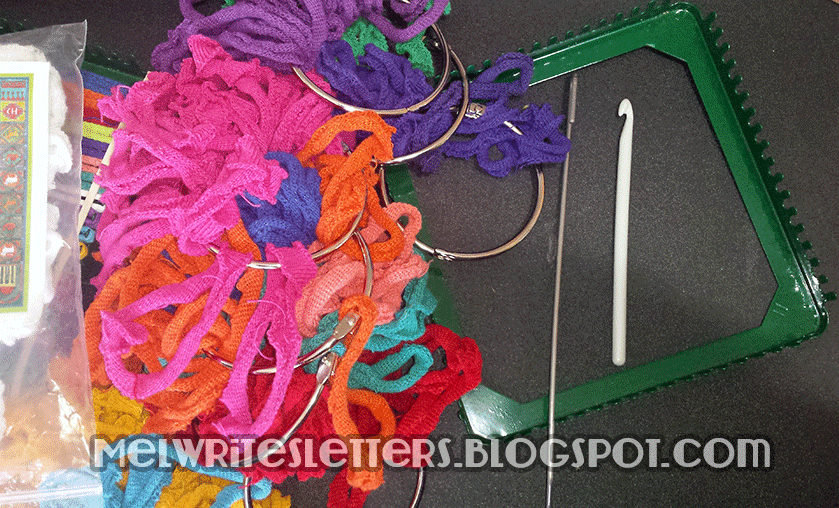

Essentials: the basic kit I purchased comes with a metal frame, a plastic crochet hook, a long metal weaving hook and a bunch of cotton loops in a variety of colors.

I cannot recommend the Harrisville Designs kits highly enough (see sources). They are sturdy, come with everything you need, and are available in two sizes: the regular traditional kit makes two ~6" potholders and the deluxe traditional kit makes six ~6" potholders. (They also have a PRO size, which I'll talk about at the end of this post.) The sell bags of loops in variety packs or individual colors, so you can do whatever you want. (At this time, I have no affiliations; this is an unsolicited rave review of a regular customer.)

I don't really recommend the Klutz Potholders book & kit. The plastic loom is the same size as the metal ones above, and it comes with a crochet hook, but the loops are a nylon/cotton blend (resulting in a smaller potholder) and there is no weaving hook. As for the pattern book (why I bought it)...there's nothing in there that you can't find online (weaving patterns, projects to make out of squares, that kind of thing). However, if you already have one, play with it!! The stretchy loops are easy to work with and the end result is fine for most kitchen duties. You just need to come up with a long hook that will help you pull the loops through. Since I have the kit, I'll probably make more in the future, and will post images on Instagram, so if you're interested, follow me there. I may do an update blog post, because I'm going to try regular weaving, but I'm not sure when that will happen.

Extras: I have added a few things to my potholder kit that I personally find to be essential, but are listed here as extras.
  • Shown above, I found a bunch of large 2" & 3"book rings that I use to keep the colors separated. This makes it really easy for me to see that I have a ton of one color left, and just a few of others, and I pick my pattern accordingly. 
  • Rubber bands: the closer you get to the end of your weaving, the more the loops like to pop off of the pegs. I'll share a picture further down that shows how I use these to keep my work together. 
  • Sturdy, ergonomic crochet hook: Crochet and I are not friends, so an ergonomic hook helps us stay civil. 
  • Patterns. Download mine, below, or check out Harrisville Design's Pattern Wizard (make sure to switch to "Traditional"). Of course, you can design your own, or just wing it with lovely randomness.
Tips & Tricks
I'm not going to reinvent the wheel and write up a how-to, since every kit comes with directions, but I will share some things that have helped me keep this activity fun.

Storage: I'm a big fan of having the right container/bag for projects and this is no exception. I picked up this square fabric basket-type thing at a HomeGoods store. It fits great in a square storage cubby shelf and I always know where everything is. 

Load your Wrist: If you're following a pattern, spend a few minutes before starting and count out the loops you need, then pile them onto your wrists (only showing on one here so I could take the picture). 

Rubber bands: I use thick rubber bands to keep the loops on the pegs. This technique has saved my sanity! You can use one around each side, or (shown), secure a few at a time on two sides. (You just have to avoid grabbing a band with your weaving hook as you go, but it's not been an issue for me.) As you finish, move or remove the bands
Finishing & the last loop: Okay, I have to admit that I have never figured out how to finish these without a loop at the end, but since I don't mind the loop, I don't worry about it too much. What I do is start at any corner, then use the crochet hook all the way around until I get to the last two loops. I put the hook through the two loops and pull another free loop (doubled) through those two. Then I pull one end of the new doubled loop through its other end and tug. Tadah! Loop. Maybe someday, someone can teach me how to do it another way. 


Other Looms
Traditional (top) vs. PRO loom

  • I recently read an article (in Craftsanity issue 6) about making your own looms, as well as weaving with yarn. I haven't tried it yet, but would like to. 
  • Harrisville Designs also makes a PRO-size potholder loom. I received one for Giftmas last year, along with extra loops. Since they're larger, they require larger loops, and more of them, so naturally they cost more to make, but seems to be in scale with the cost of the traditional loops. I will say that the larger potholders are pretty epic (seen here with a traditional size on top), but the overall cost is high, especially if you want one of the color kits. Having said that, I'd love to get my hands on the big bag of loops they sell (5 lbs., $90, traditional makes 50 potholders, PRO makes 25). ::drools::


Sources


Sunday, March 27, 2016

April is National Card and Letter Writing Month


Not to be confused with other letter-writing months, as far as I can tell, "National Card and Letter Writing Month" is an event created and sponsored by the US Postal Service. They even have a tie-in with Scholastic (it is fun, so check it out (PDF)).

Prior to 2001, the event was called National Letter Writing Week.

I recall events in school in the early-to-mid seventies that are reminiscent of the PDF linked above. We made post cards and our own postage stamps and pretended to mail them. In fact, I remember being pretty freaking impressed that people could just make their own stamps and glue them to a card or letter without spending any money. (I figured out the truth, eventually.)

In 1980, the USPS released a sheet of six different stamps (15¢) in honor of the week-long event. In 2001, they changed the duration of the event to one month. and in 2015, a new stamp was released (From Me to You (Forever)), that included extra stickers.  

Regardless of the event's origins, ending and receiving mail is a great way to feel good or bring warm feelings to others. Very few people get real mail nowadays. I'm not the birthday card sender I once was, but I have heard from some people in the past that the card I sent was the only one they received. And it really is just nice to get something personal in the mail. So, I encourage anyone reading this to set a goal and send some cheer.

It's also a great way to keep handwriting skills from going completely stagnant. (One of the reasons I started finding and writing to pen pals in the last year is because my handwriting was becoming illegible.)

I signed up for the Write_On challenge/campaign, which means I'm going to try and send thirty pieces of mail during the month. (Yikes!) I didn't do so well with the goal I set in February, but that's in the past. Each challenge is a fresh start, right? To keep track of my progress, I created a simple calendar/planner page (8½ x 11"), which I'm sharing below.

I'm also including some links to other events that might appeal. But you don't have to join anything. Set your own goal. Maybe it's to send some thank you notes, or "thinking of you" cards, or fun mail to your kids, nieces or nephews (bio or honorary). Connect, however it works for you.

Sources


Sunday, March 13, 2016

Decorated Envelopes - Poe and the Raven (Nevermore)

Since remounting and reorganizing all of my rubber stamps, I've felt compelled to use them more. Naturally, being me, I've also felt compelled to add to my collection, with one main goal in mind: to decorate my outgoing mail! Since I love themed mail, that's where I've been focusing my attention.

I decided to go kind of meta on some envelopes and include some vintage postage stamps from my collection in the theme. What ended up happening is that I started planning envelopes based on what postage stamps I could incorporate, and scouted out rubber stamps, etc. to fit the theme (it's just how my brain works). First up are some Edgar Allan Poe-themed mailings. I hope you enjoy! (See end of post for sources.)

[Disclaimer: none of this is necessary. The letter in the envelope is what counts, not what's on the envelope or, for that matter, the goodies inside. It's just another way to have fun with mail. I don't elaborately decorate every envelope, just some of them.]


To be honest, the first Poe/Raven envelopes didn't start out to be quite such a production! I found and ordered a Poe rubber stamp to go along with my postage stamps. I stamped it on white tissue paper, using a dark, solvent ink pad, mainly so I wouldn't waste envelopes if I messed up. That's when I discovered something that's probably common knowledge to other stampers: this ink was so dark that I could flip the paper over and use the mirror image. (Note: if you use this method, the ink will go all the way through the paper. I was luckily able to clean up my desk with alcohol swabs, but if I'd stamped on a different surface, I might have damaged it permanently. Next time, I'll have some scrap paper underneath!)

Poe facing left is a mirror image (back side of tissue paper).
I used modge podge to affix two of the images to envelopes, then decided that it needed more. I used some spray stains I have (that I still really haven't figured out how to use) to give the background some more detail. Should have done that first (which I did for the next two)! I then pulled out the small raven and "Nevermore" stamps that I had already planned to use, and also grabbed a new raven and candlestick and tried several variations. I tend to do "limited edition" runs, and quit at four.

But then... I realized that I had STUFF. I had some old recordings and put together a mini mixed CD. Ribbon became bookmarks, I split up a small sheet of raven stickers (only six to a pack) and, finally, remembered the Edgar Allan Poe bandages I had in my goody drawer. This is totally overkill, but it was so much fun to put together! Future envelopes will not be this extensive! (It was kind of exhausting. And, like I said, overkill.)

I will definitely not do the mini-CD again, since it appears that not many people have a drive that will accept them. It was fun, though, because it fit in the #10 envelope.

One last touch: I realized that if all of the little items ended up bunched together in the envelope, this could put the thickness into "package" territory once a letter was added. It's my goal to avoid this extra cost*, so I cut some thin cardboard (I save all of the sheets that come with postage stamps) to fit the envelope and taped all of the items to it. (It would also help protect the CD.) I also added a washi tape tab at the top of the card to help the recipient get it out of the envelope. I had to add an additional 22¢ stamp for the weight, not shown in bottom pics, but my goal of keeping it under the thickness restriction was met.

Later, I found a background rubber stamp with some of The Raven as text. I'm still experimenting with those, but they've been fun so far. The one pictured here went to the winner of the Halloween vintage postage stamps from a previous post.

*71¢ to 93¢ for a heavier envelope, but minimum $2.54 for any weight that exceeds the height/thickness limit. That's a pretty dramatic difference.

I recently posted a question on Instagram, asking my current pen pals to let me know if they would like (or wouldn't mind) getting Halloween-themed mail year 'round. I'm also sending out these little cards as letters go out. For any that say yes, I'm marking their page in my log accordingly. For those that are not interested, no worries. I have other ideas.

(l): normal stamped image; (r) reverse side of tissue paper
Sources

  • Ink for the tissue Poe & CD: StazOn black. Other stamped images: Ranger Archival in Jet Black.Block of text background (red envelope) used Ranger Archival in Watering Can. The spray stain is from Ranger's Distress.line.
  • Envelopes: The #10 gray envelopes are from Paper Source ("cement," being discontinued). The red envelope is from a random office supply store, left over from Xmas.
  • Sticker from Little B (technically a crow, but they're related)
  • Ribbon: sorry, can't give source. I bought it at a rubber stamp store in Northville, MI called Stampeddler Plus last fall.
  • Bandages: Archie McPhee (for added fun, I bought mine in Hell, MI)
  • Stamps


Sunday, March 6, 2016

Custom Sticky Notes

We live in a digital world, but just about everyone still has occasion to jot down some thoughts or leave a note. For those of us who are letter writers, we can probably think of many uses for sticky notes and several for customized ones.

Here's an easy DIY project for you: sticky notes that you can customize or personalize to your heart's content.

I've been making my own personalized sticky notes for some time. They are inexpensive (compared to having them printed) and can be highly customized. I wasn't a huge fan of the templates I started out using, so I made my own, which I'm sharing today (8½x11" only right now -- I can do A4 if there is interest). The only drawback would be for anyone bothered by the virtual impossibility of having them in a perfectly square stack (see image).

What do you need?
  • My templates (or make your own**). The PDF is the layout copy (with printed grid lines). The Word doc is the print copy (without printed grid lines) that you can customize to include your own text or art.
  • 3x3" sticky notes If you want a different size note, see the details at the end of this post** to see how to make your own guides. (I'm avoiding naming brands in general, but I really do recommend Post-it notes: you want these to STICK during printing; I wouldn't trust dollar store notes in my printer.)
  • Inkjet printer (I recommend printing the actual notes on an ink-jet printer, just to be on the safe side. The layout sheets can be printed on any kind of printer).
  • MS Word (Open Office Writer should also work okay)
  • Artwork (clipart, logo, etc.), or you can just type some text. To show that you don't need fancy software, I made my "logo" (above) in PowerPoint and saved it as an image. 

How to make your own custom sticky notes: 
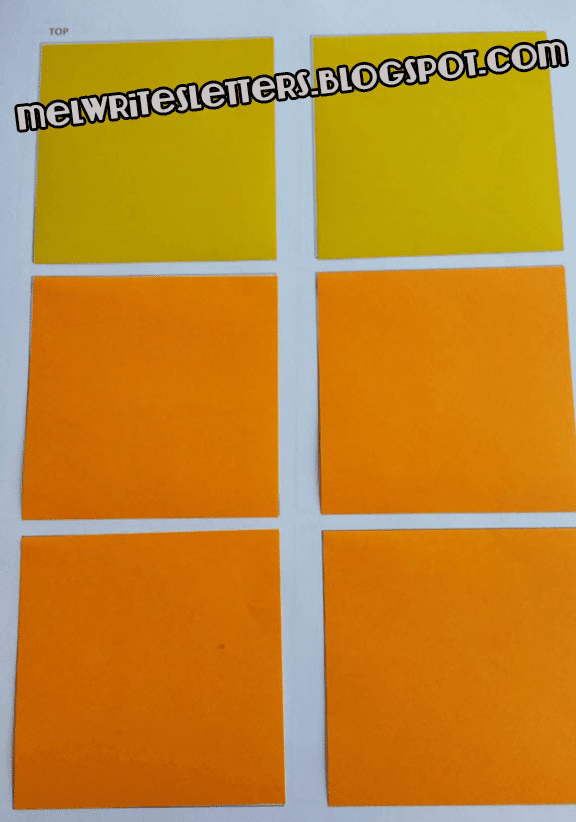
  1. If you have access to a copier, print one copy of the layout document, decide which will be your top edge* and mark it. Then make as many copies as you like (each will produce six notes).
    If you don't have access to a copier, print as many copies of the layout document as you like, then mark the top on each page*. 
  2. Apply sticky notes to the squares on the layout, with the sticky edge towards the designated top edge (any other way might lead to paper jams).
  3. On your computer, add your details to the print version, making sure to rotate them so they'll be aligned to the real top edge of your note*. These guides are just a table and are not locked, so if you want text (e.g. "from the desk of...") at the bottom, consider using a text box instead of hitting [Enter] a bunch of times. The fun part is that you can do up to six different versions in one go, with different images, text, etc. 
  4. Print this version onto the layouts that you've applied the notes to, making sure the top of the layout sheet is pointing in the right direction for your printer*.
  5. Peel notes off of the layouts and stack as best as possible.

* My old printer fed paper at the short edge, so I marked the actual top of the page as the TOP and aligned my notes accordingly. My current printer tray feeds pages along the long edge. so next time, I'll have to make one of the long edges the top to avoid jams. This makes things more complicated, because I will also have to remember to rotate the content in the grid so they'll be in the right place on the printed notes. I actually ran some tests through the old way and they were fine, but your mileage may vary. As always, I'm not an expert and cannot accept any responsibility for issues that arise with equipment I've never seen.

I may do a rotated version for printers like mine.

** All you need to do is create two almost identical versions of a document with the correctly-sized grids. On the layout version, the grid lines will print so you can align your notes. On the print version, the grid lines should NOT print. Only what you add to the spaces intended for your notes will print.


Wednesday, March 2, 2016

Marshmallow Woes

Looks like it's back to the drawing board for marshmallow perfection. The batch of red hots marshmallows I wrote about a couple of weeks ago was perfection. Two weeks later, they were still excellent. I made two batches over the weekend - vanilla & red hot (again) - and things did not go as well this time. No pics because it's hard to convey in pictures. The vanilla ones were edible, but not great. The cinnamon ones were awful. I followed the same steps, or so I thought, but there was a dreadful imbalance, perhaps with the amount of water with the gelatin? Anyway, I've ordered an entire book of recipes with lots of front matter and marshmallow logic. Hopefully, I'll have something to report again in the near future.

Wednesday, February 24, 2016

Vintage Postage Stamps Series: Halloween + a Giveaway!

February is the perfect time to write about Halloween-y postage stamps. At least it is for someone who loves all things creepy and eerie. I recently started reaching out to my pen pals to see who might want to get Halloween-themed envelopes (or letters) year 'round and immediately started in on decorating envelopes. My one (small) fear is that I'm going to run out of ideas and have to send plain envelopes come October. (I'll share some of those images in a follow-up post; this one is going to be long enough.)

As per usual with my vintage postage series, there's a giveaway (my best yet)! I hope you stay long enough to at least scan the post, but definitely check out the end for contest details.

As mentioned earlier, vintage Edgar Allan Poe stamps were the philately equivalent of a gateway drug and led me to start gathering/collecting postage stamps. I don't believe I've exhausted the theme, but I'm pretty ecstatic with what I've managed to gather. I have started spreading them out a bit, so I'll mix a couple of my spooky postage stamps with some modern ones, so I can make my "supplies" last longer. If you're interested in growing your own collection, check out my tips at the end of the first vintage postage post.

There are actually two Poe stamps: a 3¢ from 1949 and a 42¢ from 2009. The latter is pressure-sensitive (sticker-style), so it may not truly count as "vintage," but in my book, anything I can't buy at the PO right now qualifies. I like to use these together, with a modern, lower denomination stamp to round out the current rate.

If I was excited about the Poe stamps, I was over the moon when I discovered the brightly-colored 10¢ The Legend of Sleepy Hollow stamp (1974). I have a love/hate relationship with the original story by Washington Irving, but I love the imagery! It also has a sentimental significance, not to mention all of the works it has inspired. In addition to the stamp featuring Ichabod on the run from a headless horseman, there is a 1¢ stamp from 1940 featuring the author. This stamp has a little-known dual purpose: Mr. Irving sort of invented Christmas as we know it (in the US anyway), so you could use them on holiday cards in December.

The 32¢ pocket in my stamp notebook is the fattest because it has both Alfred Hitchcock (1998) & Classic Movie Monsters (1997), among others.

In addition to being a fan of such classics as The Birds, Psycho, The Lady Vanishes, etc., I introduced my goddaughter to Hitchcock movies when she was nine (Rear Window was her favorite for a long time). I put one of these stamps on almost every letter I send her (along with a Sleepy Hollow one), so I tend to hoard them. Note the sweet laser-cut profile in the upper left corner of the stamp.

The Movie Monster stamps are just so...well, they're the perfect Halloween stamp. I have done a Frankenstein's monster-themed envelope and am contemplating what I might do for the other three monsters in the set. I have a candelabra rubber stamp that might do for the Phantom; the Mummy & Dracula would probably be easier.

The Night Friends sheet (37¢, 2002) features four different American bats. These are just fun.

Honorable Mentions

  • Harry Potter series
  • Circus stamps (current Circus Posters (forever) or vintage (29¢,1993)): at least the damn clowns (I am actually not afraid of clowns*, but I recognize their potential as scary creatures and have totally used at least one clown stamp as part of a postage collage.) 
  • Carnivorous Plants (34¢, 2004).
  • Coming sometime in 2016, the USPS is releasing a Jack-o-lantern stamp, so there will be one more to add to the collection. 
  • You can always make your own! 
Outside the US? Canada still wins for its Haunted Canada series. I'm not sure what else is available - some countries have more fun than others with their stamps, but you might have to get creative when it comes to stretching the theme. 

Giveaway Time

One lucky commenter will win the 18 stamps pictured in the "giveaway" image, left. Anyone is eligible - even if you've won before - and I'll ship anywhere. There is at least one of each stamp mentioned in the main part of the story (plus one from the honorable mentions category (Carnivorous Plants)). Bonus: one of my custom (ghost) postage stamps that you cannot get anywhere else. All of the stamps are unused and unhinged (cannot guarantee mint condition), and can therefore be applied and included as part of any US postal rate.

To enter, simply comment here and tell me which of the above is your favorite OR suggest a themed stamp not included in the post. That is it!! I'll pick a winner on March 5th or 6th. Shares are not required, but will be rewarded if I'm aware that a winner shared the link. Important: make sure I have a way to reach you if you win!!

----------------
*Clown dolls are a whole 'nother story.


Saturday, February 20, 2016

Blogging, Interrupted

Hi, y'all. I'll be back to my normal, semi-regular blogging schedule soon. Life has just not cooperated, what with the husband and I getting violently (but temporarily) ill a few days apart ('flu or, if it's possible, some terrible contagious food poisoning (what we thought he had)).

I have posts in progress, just nothing ready to publish yet. Because I'm an impatient person and posting to Instagram is easier than writing a whole blog post, some pictures of the following can be seen there, but with less commentary (and no prizes).

  1. Lip balm: I make lip balm and have some to give away, too. 
  2. Halloween-y stamps and themed envelopes, and yes, some (stamps) to give away!
  3. I resurrected my old planner and created new pages for it. I may have a couple of free downloads to go along with that post. 
  4. We just tried our first Hot Pot. Had to do it at home, because there are zero restaurants within driving distance that serve the real thing. It was yummy and I have pics. 
  5. Sometime, down the line, I'll share the authenticity post I've been working on. 
  6. ? I take suggestions. Comment away or email me (see profile for email link). 
I didn't get any comments for the last giveaway, but that just means that the prize didn't interest anyone... or no one read the post. 'salright. I'm not quitting yet! I'll buy your love, somehow. ;-)