Pages

Sunday, January 31, 2016

Pen Pal Log Free Downloads and More

Pen Pal Log
A few days ago, I posted about my pen pal/mail log and promised free downloads and other details. If you want a pen pal log, but don't want to create your own, then use mine!  These pages were designed for a disc-style 8½x5½" notebook/planner (print full letter-size sheets then cut in half). I created my log based on products I already owned, so it literally cost me nothing except paper & printing. Going out and buying all of these things just for this log can be pretty pricey, so you may want to research other binding options. (I am, and will update this post if I have anything to report.)

Files
Download these three PDFs and print as needed for your personal use (no selling or mass distribution).The files linked below have been saved to Google Drive. If you cannot access them, feel free to email me (see profile) and let me know which page(s) you want and I'll share via email.[Update: link to post with full-size pages.]
  • To-Do: is my letters to write sheet. I print this page single-sided, so I can see at a glance what letters I owe without flipping pages. It should work fine printed on both sides if you want to save paper. 
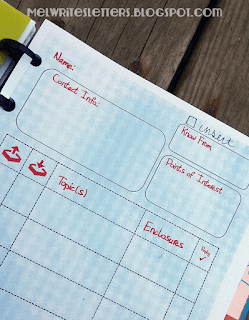
  • Mail: is my individual pen pal log. This PDF has 2 pages; when printed correctly & cut in half, you will have two 2-sided log pages per sheet of paper. If possible, print on paper that is a little thicker/smoother than regular copy paper. The pages will be a little sturdier and you should be able to tape little notes with washi tape and remove/replace without damaging your sheets. 
  • Enclosures2: is a slightly different page than shown in the previous post. Trying to have 4 different enclosures per page (two columns each side) was hard to keep straight, so I took this opportunity to tweak it a little. (I couldn't rearrange things, and if I ended up sending a lot of one item, there was no place to overflow.) I'm thinking about printing this 2-sided, but only using one sheet per enclosure. If you want the old version, with two columns, let me know.
Materials & Tools
Punch: Why is this listed first? Because quite honestly, the punch is probably the most expensive component if you're starting from scratch. If you you already have a punch that will work on 8½"x5½" paper then you're all set. If not, check with friends/family to see if anyone has anything in this size that you can use before you go shopping. (People are forever buying things for a planner system, then changing their mind (how do you think I have all this stuff sitting around?).) Unless you can easily afford to buy a whole other batch of stuff, find your punch first, then base your notebook and accessories on that.
  • If you're buying one for a disc-style notebook, I recommend the Circa portable punch; while it only punches a couple of sheets at a time, it's less than half the price of the full-size one from Staples that has a shallower punch (and is decidedly not portable).
  • A 3-ring punch might come into the printed area a little, but a punch intended for a planner that size (Franklin, Day Runner, etc.), will probably work, even if it has too many holes. This one from Staples (Amazon link for convenience) has mixed reviews but is not expensive and is the right size. One thing I've been trying to do is convert an old letter-size 3-ring punch to work for a mini binder. If I manage to succeed, I'll post an update. If you want to really save money and are willing to spend the time, make a template out of thick card stock, and hand-punch the holes. 
Notebook: Once you know what kind of punch you have (or are going to buy), you can match a notebook to it.
  • Disc style: I re-purposed an old Arc notebook, but actually prefer Levenger's Circa notebooks (Junior size), because the punch goes a tiny bit deeper, which means the pages stay in the book a little better. Honestly, if you order from Amazon Prime, the basic Circa notebook is just $2 more than the Arc and is, in my opinion, the superior product.
  • Non-disc style or ringed notebooks: search Amazon for "avery mini binder" or dig up an old 8½x5½" planner.
Accessories
Sticky Notes helped me remember to use this
Miss Piggy stamp
  • You don't have to buy dividers, although the heavier ones are nice for frequently-used sections. You can see in the video that I purchased one set, then made additional dividers with cardstock and stick on tabs*. The accessories from both brands** are pretty much interchangeable, which is helpful, in case you find a sale. In fact, on Amazon, you can order the Arc tabs for $4.99, with free shipping, which is less than half the price of the Circa dividers. For ringed binders, see the "mini binder" results on Amazon for pretty inexpensive tabs. 
  • Sticky notes are pretty essential. I make little notes about all kinds of things and attach them to my pals' pages. Example: one of my pals used Muppet stickers on an envelope, and mentioned them in another context. I have Muppet postage stamps, so I made a note to make sure to use one of them on the next letter I sent. I transferred that note to the letter when I started to write it, so I'd remember when I stuck it in the envelope. 
*Watch out - I accidentally bought "angled" tabs. I'm using them, but they bum me out. 
**There could be others that I'm not aware of.

Saturday, January 30, 2016

A Month of Letters and Mixed Tape Monday Announcement

Yesterday, I said I was suddenly a joiner. I wasn't kidding! Not only did I join the 5 Fandom Friday, but I'm going to be participating in the Month of Letters (LetterMo) challenge. I've committed to sending 24 pieces of mail during the month of February - every day except Sunday and the 29th.

If you want to play, go to the above link, then click on the "Sign Up" tab and register. We'll figure the rest out as we go! (I signed up as epicmel.)

It's a little intimidating, but I'm going to give it a go!! (I'll probably use the Sundays to get a little ahead of the game. I'm an anarchist, so I can do that kind of thing.)

In addition to joining stuff, I'm about to launch my own themed ...thing, the very originally named Mixed Tape Monday.

The first post will have all the details, but what I'm thinking of is picking a theme, sharing one or two songs (via YouTube videos or other media), and the reasons I chose the song(s) and maybe even share some lyrics.

If anyone else wants to play, I'll create a page to list all the participants, linking to their blogs.
Each participant would be free to pick their own theme. I can post a list in advance of what I'm thinking about doing if anyone would like some help.

So come back Monday for more about Mixed Tape Monday!!

Friday, January 29, 2016

5 Fandom Friday: Favorite Late to the Game TV Discoveries

I'm a joiner all of a sudden. I just joined The Nerdy Girlie's 5 Fandom Friday and hope to keep up with it. I discovered the blogalong (?) on a penpal's blog: The Unicorn Princess. I even made my own little banner! I'm joining something else and am starting another thing, so please come back tomorrow for those details!


This week's topic is: Favorite Late to the Game TV Discoveries. I know a lot people do these lists in reverse order of significance, but I'm just posting them in the order I think of them.

Babylon 5
This is my most recent discovery. Season one was tough to get through (I was warned of this by several people, including the friend who gave me the first set of DVDs), but it really picks up and gets fascinating very quickly in season 2. I got special, bonus geeker joy by responding to the intro for the first two seasons. Whenever the captain said "in the night," I would respond with "in the dark." (I'll send a goodie to the first commenter who gets the reference (offer expires 6 months from today).)

Doctor Who
I know, I know. Truth is, I was very aware of the show. Actually, probably more aware of The Scarf. But for some reason, it never crossed my radar growing up. I never saw a promo for it, or "coming up next" notice or anything. I didn't meet The Doctor until the show was revived in 2005, and boy howdy, was I all over it from the first episode. I've managed to see quite a bit of past Doctors, but not nearly enough. 

I'm hiding the rest behind a cut, because all of these videos are going to make for a long scroll for someone that is not interested. 

Thursday, January 28, 2016

Pen Pal Log

Two mail-related things happened last week that made me sad. First, after not getting any mail for a few weeks, my husband came home from the Post Office with a small stack of envelopes, none of which were posted recently; two had been mailed (domestically) before Christmas! We have no idea where it has been all this time - perhaps in the box of someone who doesn't visit often? I was able to notify all but one of the senders immediately online, and sent a post card to the last, so they knew I wasn't ignoring them.

The second thing that made me sad is the reason I'm finally doing a post on this subject. When I went to log that new stack of mail, I found a hole in my letters to write checklist: no checkbox where one should have been. Oh, crap! I wrote a lot of letters and cards over the holidays, but had neglected to respond to one. Luckily, the letter wasn't lost, and once aware of my mistake, I was able to make responding a priority. If I hadn't kept that log, however, I might have come across the older letter, assumed I had already answered it, filed it away and that pen pal would never have written back (having nothing to reply to), assuming I wasn't interested in corresponding.

This is why I keep a log. I'm sure everyone has some kind of system that works for them. Maybe a stack of letters to reply to. Maybe a spreadsheet or a simple to-do list. I use a redundant system to make sure I don't have to rely on my memory. It's in a book, which is harder to lose than a sheet of paper. It can also be changed easily if I find something in the future that works better. I know that not being able to arrange or remove pages would make me crazy, so the notebook I selected allows that.
I don't make a lot of videos, as evidenced by my camera work (which I hope will improve), but here is a tour of my pen pal log.

There are two main parts to the book. First, every pen pal has their own page, where I put their contact info, and list details about both incoming and outgoing mail. They're sorted alphabetically, and separated into groups, so it's pretty easy to find whatever page I need. On the back of each page, I tape their response to the little question card I send out. (I use washi tape, so I can easily move the card to the front of the page when the list flows over to the back.)

At the front of the book, I keep the heart and soul of the log system: my "Letters to Write" page (top picture). It's simply a list of letters I need to write that I mark when in progress, and when sent. Whenever I get mail I need to reply to, I first add the person's name to this page, then add more detail on their own page. It was the gap on this page that led me to realize I was long overdue in responding to one pen pal.
Beyond that, I try to keep a list of goodies sent on an "enclosure" page (one section per type of enclosure). I'm not great at keeping this up to date with things like washi tape samples, but have been pretty good when it comes to CD mixes and smashed pennies. This way, I hope to avoid sending the same little giftie to the same person twice.

I have a section for extra pages, one for basic postal rates, and one for inactive correspondents. These are either people I don't write to a lot, but want to keep a record of which cards I send, etc., or they are people who were pen pals who stopped responding (or never responded at all). This way, I don't have to flip past their pages over & over, in the "active" section and be reminded that they've dropped off the radar. I go through it every couple of months and move truly retired pages to a drawer.

I'd love to see what others are using! How do you keep track?

Interested in making your own pen pal log like mine? In a few days, I'll be posting the files, plus a list of resources. Stay tuned!

Update:


Tuesday, January 26, 2016

Reclaimed Postage Stamps Tutorial

This tutorial will show you how to reclaim non-canceled vintage (gummed) stamps from messed up envelopes (or for collage purposes).

Far too often, I mess up envelopes I'm planning to mail, or decide not to send something, so I definitely want to get those stamps back before the envelope goes in the trash! Because I order stamps via eBay a lot, I sometimes get cool stamps on packages that I might be able to use in a collage. Older, gummed stamps are far easier to reclaim than modern, pressure-sensitive (sticker) style stamps*; I have not had wonderful luck getting the sticker-style stamps off of paper, but have had amazing luck reclaiming vintage/gummed stamps.

This how-to is not for stamp collectors who put stamps into albums. You really want to find an expert (there are probably several on YouTube) who will demonstrate what tools, etc. to use. 

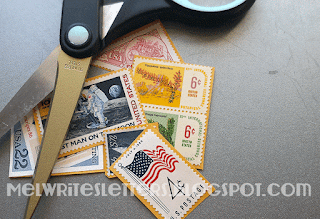
First, cut off the section containing the stamps (top pic). 

Cut out each stamp close to the edge without cutting the actual stamp. (If the stamps are still connected, you can leave them that way.)

Next, get a large, shallow bowl or dish and fill it with hot tap water. 

One by one, add your cut-apart stamps and tap them gently to submerge. Just do a few at a time - a little gumming may remain and you don't want them to stick together!

Wait a few seconds. It may take longer, but in the batch I did this morning, one stamp was floating free from its backing before I had added them all to the bowl.

Remove the stamps from the water with your fingers or tweezers and lay them on a paper towel. I usually set them out face up, flip them after about a minute (shown, right), then cover them with something lightweight & water-resistant to keep them flat (and safe from the cats' antics). 

When they're completely dry, put unused ones back (wherever you keep your stamps (I keep mine in a 3-ring binder, with one labeled sheet-protector for each denomination)) and toss the used ones into your ephemera collection.

When you're ready to use your reclaimed stamps, you'll need a good adhesive (I use Elmer's extra-strength office glue sticks; some craft glue sticks don't hold as well).

*Bonus pic, and a promise: I'll put together a tutorial showing how to retrieve modern, self-adhesive stamps from messed-up envelopes (or SASEs included in begging envelopes).

Update: done! See tutorial, here. 

Sunday, January 24, 2016

Real Workspaces

This is the space I do a lot of my paper-crafting (not letter-writing, because it's too low) and photographing because it's in front of a window. This is also how it looks a lot of the time, including the cat's ass sitting on whatever I'm trying to get done. Just thought it might be a nice change from the perfect spaces a lot of people post. (I'm not being holier-than-though here; I'm not going to share a pic of the whole room until it's in a lot better shape!) One of today's chores is to clear it off.

Saturday, January 23, 2016

Hand Exercises for Letter Writers

Photo provided by Rebecca Connor
(also the hand model)
Yes! A reader-requested topic. Tina, this is for you!

After finishing writing her Giftmas cards, Tina's hand was in a bad way. She posted about it on Facebook & tagged me, suggesting that I do a post on hand exercises for letter writers. It's long past the time now for marathon Giftmas card-writing (unless you're really behind or starting really early), but it's never too late to start preparing for your next session.

I have wrist issues (more at end of post), and I've been meaning to check out some ways to help my poor wrists, but you don't need a repetitive strain injury (RSI) to get achy hands - anyone who overdoes it can get sore. Marathon card-writing is just one way. There are plenty of other hobbies with repetitive motions that can require stretches and/or exercises: gaming and needlecrafting (knit, crochet, etc.) are just a couple of examples.

Disclaimer
Part of my outgoing Xmas
cards for 2015
I'm not anywhere close to a medical professional. What I'm doing is relaying things I've read that made sense, and linking to some sources. What you do with this info. is entirely up to you. I recommend that you do your own research and, if you have actual pain that doesn't go away, see a doctor. I put off seeing one for a very long time. I even figured out a new way to write that required very little use of my thumb*, but actually seeing a doctor would have helped get me relief earlier: there are treatments and simple tools that are good for RSIs, arthritis, etc.

This post is about strategy as well as exercises, because I think both are important and because I'm not qualified to write an entire article about exercises (see above).

Strategy
Make sure you're sitting at a table/desk with both chair & writing surface at a comfortable height. (I always write better at a desk/table, but most of the time, I'm using a clipboard on the couch. Old (bad) habits die hard, I guess.)

This year, I started out at a table.
(I didn't stay there, though.)
Observe your writing style, particularly how you hold your pen. If you find that you're writing with a death grip on it, look for a larger barrel or a cushion grip to make the barrel larger and easier to hold.

Take a look at your pen & how it writes. Besides how comfortable it feels in your hand, look at the ink flow. Does the pen skip or does it require more pressure, which can add strain? Try a bunch of different pens. They don't have to be pricey: my favorite pen for writing & addressing cards** costs $2, and the fountain pens I use for writing letters are under $5 (plus ink). I'm also a big fan of Sharpie pens, which cost around $3 each. Of course, you can spend more: what's important is that you can write smoothly, with as little pressure as possible.


During your writing session, take regular breaks and do some basic stretches.

There is also this concept of starting earlier and working in multiple sessions, but that's just crazy talk.

Exercises
Check out this web.md article about hand and finger exercises, which I'm going to start trying (the site sucks; sorry about that). Some will loosen tense muscles and some may help strengthen your grip. #9 specifically mentions holding a pen and writing. Note: if you have - or think you have - an RSI, take care (see disclaimer): the ring finger stretch (#6) irritated my carpal tunnel and one exercise has a notation to not do it if you have a thumb joint injury.

Just a few minutes on YouTube revealed that there are a TON of videos from all kinds of people claiming to be professionals, and a lot of them seemed to contradict each other. I liked this video - although it is geared towards gamers, the strategies and stretches seem common sense and low-impact (some of the stretches on other videos scared the shit out of me). Dr. Levi suggests taking regular breaks, submersing hands in warm water, and stretching regularly. 

Fun with ortho splints
My Wrist Stuff
I have De Quervain syndrome (right hand), plus carpal tunnel (left). I also sucked my thumb*** into my college years (unconsciously). I cope pretty well now because I no longer do the kind of work that led to the aggravation, refuse to work at a self-injuring pace, and learned how to do certain things (like mousing) with my weak hand, so I can switch if I start having issues. I have not been able to learn how to legibly write with my left hand, but maybe someday. (Have you ever tried it? It makes me very tense and anxious and makes me sympathize with left-handed children (like my dad) who, decades ago, were forced to learn how to write with their right hands (mostly for religious whack-job reasons).)

With all of the precautions I take, I have more issues with my hands while I'm sleeping than when I'm writing, so I sleep in thumb-stabilizing wrist splints (not as extreme as those pictured here, whew) and only wear one during the day when needed. My doctor doesn't seem to be concerned at all with me exercising my hands/wrists, but I'm going to try - if I can do it without pain.

Footnotes
*I call this my "injured thumb pen hold." Can you see how little my thumb is involved in holding the pen? (The quality of the original video from 3½ years ago was too poor, so I've recreated it. Pardon the ink stains.)

**The Pilot envelope address-writing pen comes in 3 point sizes. If you get them all (recommended), don't worry about the fact that there isn't a word of English on the label to tell you which is which. Look at the little oval on the pen cap. The broad (shown above) is black, the fine point has a black border and the extra fine has no border. It only took me two years to notice that (there is a tiny code on one sticker that also tells, but the pen cap is sooo much easier)!

***Probably not a factor.


Sunday, January 17, 2016

January 2016 Updates

A couple of quick updates:

Letter Folders
One of my penpals posted a little video showing one of my folder letters/flip cards that I posted about earlier this month. @theritzymailbox is her snailmail Instagram account (a lot of people do this, but I can't keep multiples straight, so all of my stuff goes in together). Since I cannot get IG embeds to work for me, I had to download the video and repost, but here's the link to @theritzymailbox's original on IG. It is 100% her work.


Fun with Fountain Pens
I've had a bit of mixed luck with the pens I wrote about here. The free eyedropper pen that came with the large bottle (that got the whole obsession started for me), turned out to be a dud. I had a major ink leak all over my case, hands and desk. The pen was prettier than the ones you can buy from the sites I shared, but I couldn't fix it, so it's gone, gone, gone. I've had no troubles with the conversions that I did.

I did learn that taking fountain pens - at least this variety - on planes isn't the best idea. I had seven or eight  pens with me on a short flight and four of them leaked - through the nib, not the conversion point (that held solid). Cleaning that up was kind of a nightmare! And the worst of it was that I didn't need them with me. I never opened the case until I got home and unpacked my bag. :-( So, the rule for me is, no fountain pens on planes. (Maybe nicer pens would hold up better, but I wouldn't want to risk an expensive pen!)

Resources
I've added a page for Resources (always available via tabs at top of page). It's a little sparse now, but I'll be adding to it as time goes by and I continue to find cool things.

Giveaways
I had one commenter for the first giveaway, and doubled that for the second!! Both winners were reached and the first prize was sent some time ago. The latest contents winner was just notified yesterday, and I'll be mailing the stamps out this week.

Saturday, January 16, 2016

Product Review: Mister Ghost's Highly Enviable Monthly Parcel of Simple Yet Amazing Wonderments


This is an unsolicited - I dunno if "review" is really the right word, but it will do - review of Evil Supply Co.'s Mister Ghost's Highly Enviable Monthly Parcel of Simple Yet Amazing Wonderments, a parcel available on a monthly basis, or by subscription (for a discount). I ordered the January box, Positivity & Necromancy, which arrived yesterday. When you order from Evil Supply Co. (ESC), you have the option of having your package haunted or cursed (or not).

I'm a firm believer in this notion that the best way to find new products/companies is via recommendations from friends. Better yet if they can share something with you that you can actually touch or use. It's why I like to hand over one of my Pilot Envelope Addressing pens to pen geeks I meet to make them try it. (I've also been known to give them as gifts.) That's how I found ESC and eventually came to order my first Mister Ghost parcel.

It started with a new pen pal (@amysnotdeadyet on IG) including some great goodies in her letter, which arrived last Halloween. Naturally, I loved Amy's own work (all the art in the middle (check out her shop))! I was also intrigued by the stickers (on the left) & Ghost-a-gram card on the right, which turned out to be from ESC - who wouldn't love to get a package with a "may be haunted" sticker on it? (See sticker page for current offerings.)

From that point on, I've been aware of ESC. Friends have shared links with me, knowing my love for all things spooky. (Halloween is my favorite holiday!) Instagrammers I follow posts about them frequently, and after clicking over to see the feed several times, I eventually started following @evilsupplyco, who posts a lot of fun sketches and pictures of local cemeteries. Finally, a couple of weeks ago, I took the plunge and ordered my first box.

I don't do product/box subscriptions. The explanation is too lengthy to go into here (I know, because I tried), but it boils down to me being both cautious and picky. Even if I know I can count on the package arriving, I just know I'll only like about half the stuff that would come in it. It's just who I am. What I like about ESC's Mister Ghost's Parcel is anyone can order the current box (if available - I'm sure quantities are limited) without subscribing (for a few dollars more). Or, if you subscribe, they charge monthly*.  The themes are so "me," that I can't imagine not loving most, if not all, of the contents every month. Based on this experience, I will be subscribing, for at least a few months.

If you are reading this in January 2016, it's not too late to get your own #10 parcel, Positivity & Necromancy. The site says they are available until January 31.

My box arrived yesterday. I guess I'm lucky that the carrier crammed the package into the mail box so tightly that I had to use two hands and a bit of twisting to get it out; sometimes, he just tosses things onto the ground or into the ditch. Unfortunately, there was another package there, too (that he had delivered at the same time), so my Mister Ghost Parcel was stuck halfway out, in the rain. Luckily, it wasn't out there long enough for the rain to get into the box and damage anything. I eagerly carried it into the house and sliced through the tape. Right on top were cards declaring that "Per request at purchase, this parcel has been CURSED" and "HAUNTED." Good sign!

Starting with this parcel (#10), each collection comes in a screen-printed, zippered pouch (I think they used to be plastic envelopes). I'm assuming the print goes along with the theme each month. Mine needs a little time with a needle and thread at one end of the zipper, but it's a nominal issue. The pouches are document sized, which is pretty cool!

The contents are "blind-boxed," so they can't tell you exactly which designs are going to be included, but each parcel contains 2 small, blank booklets, an art print, 2 greeting cards (2 designs (in my case, that meant I got 2 each of 2 cards) with envelopes) & four stickers.

Also starting with parcel #10, each collection includes an embroidered patch. I recently shared my love of patches, so this was, honestly, what clinched the deal and make me place the first order. And the one I received is so fun!

The journals are adorable, and well done, but if I get two with every subscription, I will have to share some with friends (I don't think anyone will complain). I got two pairs of flat note cards, also themed, with brightly-colored (in this case) envelopes. The art print I received (under the patch) advertises "Potion of Mermaid's Breath."

From what I can tell, most of the time, the stickers are like the ones shown above, roughly the same size. They're very high quality vinyl, with vibrant colors, and are promised to be waterproof and dishwasher-safe. The ones included in this parcel (bottle labels) are the same quality, but there were 2 small and 2 large ones. I have long been wanting to gather enough bottles to make an alchemist or mad scientist lab for a future Halloween party, so these were welcome!

In conclusion, I feel that it was worth it for me to pay the non-subscription price to see the package for myself, and I'm prepared to subscribe to keep the goodness coming at a discount! A little Halloween every month...just what I need.

*Maybe that's normal now, but when I first became aware of this kind of thing, it was in the form of yarn clubs, where you had to pay the full amount up front.

Tuesday, January 12, 2016

Gifts for Letter Writers - Part 1


This is the first in what I hope will be a series of posts about finding gifts for letter writers (which could include yourself). A lot of "gift guides" are a bunch of sponsored or affiliate links. I don't currently have any associate/affiliate accounts, so anything else I post won't be sponsored, unless stated otherwise. (I wouldn't say no to a sponsorship...)

I'm particularly happy with this present I sent to my friend Anita for Giftmas in 2015. We've been real-life friends for something like 15 years (don't make me do math right now) and have have been exchanging letters off and on for several of them.

  • Stationery - all letter writers need something to write on. Unless they have an exclusive stationery or monogrammed cards they buy in bulk, they'll need paper, envelopes, cards, etc.

    I like giving personalized stationery as gifts. As far as I can recall, I always give at least one package of PaperSource text-weight paper (they come in such an amazing array of colors), with a monogram, name, etc., and a package of matching (or coordinating) #10 envelopes. An equally good option would be any of their cards (blank or personalized) and coordinating envelopes or a boxed set from anywhere (book stores have a stationery section).
  • Stamps - again, all letter writers need stamps. For my birthday this year, a co-worker gave me a sheet of the circus poster stamps. I loved them! Anything but what they sell in bulk if you don't ask (like flags) should be well-received. Better if you know some of their interests and can surprise them with a booklet or sheet of something that will make them smile whenever they use one. Note: Unless you know they're open to using vintage stamps, stick with current issue or Forever stamps (US), since using vintage requires having a variety of denominations in order to mail.

    I used one of my custom stamp gift cards to buy stamps for two people in 2015 (one hasn't been received, so I can't share it yet). Anita is all about being a Leo, so she asked for a lion (I blew the surprise to get her something she'd enjoy using). The carrier who delivered the mail that day decided that, even though it was the only thing being delivered, just slightly bending the envelope wasn't enough. He folded it in half and creased it, hard, damaging a whole row of stamps. The company replaced them, and I received them almost in time to get the gift there by Giftmas. One day late. Not too shabby.
  • Pens are a slightly different story. They really are a personal choice and preferences vary widely. Some people like heavy pens, others regular old Bic and don't want anything else. I never mind getting pens as gifts, but I use the ones I like.

    Having said that, I give the pictured pens as gifts all of the time, and the response has been very positive. These are Pilot "envelope address-writing gel pens" from Japan. available in the US only at Jet Pens, as far as I know. Sending greeting cards is a very big deal in Japan, or so I've heard, and these were supposedly developed just for that need. The flow is just amazing and they work really well on smooth paper. (I signed all of my Giftmas cards with mine, and addressed the envelopes, too.) They come in three sizes & are only $2 each.
  • Not pictured: I gave this friend, my goddaughter and myself lifetime memberships in the Letter Writers Alliance. They're just $5 each! Members get a cool patch & postcard, plus access to the members-only shop and opportunities to get new pen pals. 
Thanks for reading so far! I'll be back with more gift ideas, for whatever gift-giving occasions come up.

Saturday, January 9, 2016

Celebrate Achievements: Grown-up Merit Badges

It all started when I got to the end of a difficult book. I quipped to my husband that I deserved a merit badge for finishing Journey to the Center of the Earth, by Jules Verne. It was not fun, but it was a classic; I felt that I had to finish, and it was hard to do. No matter that it was an audio book. (I commute almost 100 miles per day. Audio books are as essential to me as coffee.)

I started looking around online; I figured there was a chance that there was something out there that would work as a merit badge. I soon realized that there were many things I've done that deserve a merit badge.

Within an hour or so of looking, and just a few hours after making the crack about needing a merit badge for finishing a book, I found exactly that: a merit badge for finishing a difficult book (aka Book Conquest patch from Patch Fever). Ordered!!

You know how when you have a mild itch on your hand or arm and start to scratch, first you think it's going to relieve the itch, but really, it's made it worse? Then you have to sit on one of your hands to stop scratching? It was kind of like that. Or, in simpler terms, I was hooked.

The book patch wasn't the first one I bought. I vaguely remembered reading something about alternative "scout" patches, so that's where I began. I quickly found The Scout Project and oh! she had a Pen Pal patch! So I ordered a couple (and went back later when they were in stock for knitting/needlework patches).

I definitely recommend the Scout Project as a starting place, because her patches are practical, fun, and affordable (it does seem like she's out of the pen pal patch, but there are a bunch more). After that, my next stop was Etsy. And boy, howdy! Was Etsy a good place for my search.

And then I went down a rabbit hole. I found so many patches that I wanted that I had to make some rules for myself. I wanted them all, but I also wanted to save room (on whatever their home was to be) for future activities. (I have a tendency to dive so deep into a new interest that I burn myself out completely. I wanted to avoid that with the patches, and keep them special.) There are dozens and dozens of grown-up badges out there, more than I can link to. Besides, I don't want to deprive you of all the fun.

One of the rules I made for myself was that merit badges had to be earned before they could sewn on or, ideally, even purchased. So I still covet that Ghost Hunter patch, but haven't ordered it, because I haven't been able to arrange such an activity with avid ghost hunter friends. (I made sure they knew I was a skeptic, and they're still willing to include me when time and all that stuff allows.)

I even saved up my mad money and got a backpack like all the cool kids have, one that patch collectors seem to like (Fjallraven Kanken on Amazon: price varies widely by seller (and color)), but you could obviously sew patches onto a messenger bag, tote, jacket, whatever you can get a needle through. I actually really like this pack. I can fit more than I thought into it and it was designed to be easy on the wearer's back It's not super-friendly to the sewing process, so look elsewhere if you're impatient about that kind of thing. I used invisible thread and a big, sharp needle.

Shown on the pack, right:
  • Pen Pal, Needlework & First Aid patches from The Scout Project (linked above).
  • Letter Writer's Alliance membership patch ($5 lifetime membership pack includes this small, triangular patch).
  • Book Conquest patch (linked above).
  • The Martian "mission patch" - total surprise SWAG when we saw the movie on opening day. I may have squeed.
  • Human Resistance patch from Storied Threads.
  • Zombie Survival patch, also from Storied Threads (their patches aren't cheap, so I only have a couple, but the quality is great and they have a fun selection).
Shown left: Not merit badges, but a tribute to my very first 
fandom, The Adventures of Buckaroo Banzai Across the 8th Dimension. I have a Banzai Institute patch (top) and a Team Banzai Jetcar patch. Both from Starland

Not shown (other side of pack): Hell, MI Route 666 patch.

This would be a great parent/child activity, too. Just avoid the naughty patches (there are all kinds out there (see?)) and have some fun! I'd love to hear from other badge collectors, so please reach out! (DM me on Instagram (see siderail for link) or email me (see profile).)


Sunday, January 3, 2016

Folder Letters

I wanted to write all about these cool letter folders I put together, but it turns out I only have one picture (I mailed the last one out today), so I pulled out an old one to show my progress. More to come: if one of the recipients posts images, I'll get their permission to share and all can be revealed; otherwise, I'll do a follow-up post when I make my next batch.

Folder Letter #1
These are probably known by other names. I've heard letter folders, too, and flip cards; if there is a proper name for these, maybe someone can let me know!

I tried one a few months ago, when I had virtually no supplies. It didn't turn out terrible (although it photographed terribly), but it felt wanting.

For this type of card, I folded the light card stock in thirds, then cut horizontal slits in an outer panel (not all the way across) and glued-down that third. which made pockets. I cut a different card stock (chartreuse, from PaperSource) for my questions & a short letter and used washi tape to turn them into a pages.

It wasn't perfect, but it was fun (and bright). I popped it into an oversized DIY envelope and sent it off.

Over the Giftmas weekend I decided to try making some with what I had on hand, based on one I recently received from a pen pal. It can be time-consuming, but I can see how it would be addictive! (It may also cost more to mail them if you don't pay attention to the thickness, which is why some of those I mailed recently might be on their way back to me as I type (see lessons learned at end of post).)

Supplies
First, I gathered up everything I thought I might be able to use. I'd recreate an entire folder if I had the right cards, but since I don't, pictured here are some of things I used, with links to sources where possible.

Basics: folded cards (smooth surface seems to work best), envelopes, washi or masking tape (at the very least to create the flaps or pages), additional card stock, tape runner, glue stick (I buy these by the case), scissors, X-ACTO knife, and paper cutter. Including little gifts, like tea or tape samples, is pretty typical and embellishments (like the office sticky notes and squirrel) are a nice touch. I also had a bunch of small treat bags and some glassine envelopes.

I have no special die-cutting machine, just a straight-edge paper cutter (with which I still cannot cut a straight line) and a few punches. I have not invested a lot of money specifically for this purpose. (The only thing I bought with this project specifically in mind were the little pre-made pouches, which I found in the teacher's section at an office supply company.) I don't have that much more in the way of "stuff" since my first attempt but I did let myself think outside the box a little more, which helped.

Folder Letter #2
 I had five black cards with matching envelopes, and that is what I used. I think they were A7 size, which was pretty good for this purpose.

Front: I took a water-based white Sharpie pen (gods, I love this thing) and just wrote "Hello..." diagonally (& hugely) across the front.

Inside cover: I cut a piece of black card stock to fit roughly the bottom half of the card & sliced horizontal slit about 2/3 down from the top, not all the way across. Using a my permanent tape roller, I glued down the card on the two sides and bottom; the top of the new piece and the slit formed two pockets. Along the top edge, I put some green grass tape and under the second pocket, I glued down a little pencil-themed tape flag, With the same white pen, I wrote "summer is coming" near the frozen-treat stickers I inserted in the top pocket. Into the second pocket went a washi tape sample card (most but not all shaped like a mason jar).

I cut down some small two-sided card stock squares so they wouldn't extend past the card's edge, and taped them to the center with some patterned masking tape. Onto the front "page," I glued a pouch and added reading-related embellishments. On the flip side of that, I glued down one of those orange squirrel notes and taped to its paw a tiny bag holding a squirrel D-clip (paper clip).

On the inside back cover, I taped down (overlapping) two more goodies: a bag of my favorite tea (in a small treat bag) and a glassine envelope holding 2 letter-writing themed stamps.

Then, the important part: I wrote letters on thinner-than-usual paper and folded them into the pouches. It all fit easily into the accompanying envelope.

For one, I had mail tag to answer, so I made another page, taping it to the back cover (top, bottom or side would have worked; I did one of those). The idea of these folders/cards, in all their forms, is to make the experience interactive, so the center page could have been just as easily taped at the top as in the center.

Lessons learned:
  • I need to pay attention to the thickness of the packages. A slightly heavier envelope might cost around $1 to mail (94¢?) domestically, but a too-thick letter can become a package (closer to $2). I didn't think to see if the envelope would fit through the slot in the tool* I have until today, so 2 of them will probably come back to me. Next time, I'll try not to overlap and might have to skip the tea. Or, simply calm down and not try to send so much at once.
  • I definitely need to get better-quality cards for the base - trying to re-position washi tape on these was a pain, since it pulled away the cards' surface. But, as long as I went slowly and didn't have to pull up tape too often, they worked out okay. 
  • Dare I say that my letters might be too long? The too-thick envelope from this AM was 3 full sheets, front and back. I might need to make myself be less chatty when sending these and make it all fit onto 1 sheet. 
  • Thinking outside the box is good. I probably had plenty of things to make my first folder more fun, but didn't think about it enough. 
  • I'm glad I made all of them (5) at once. Then they were done, and were just ready and waiting as I finished letters for them. 
My goal is to get one of some kind to each of my pen pals (I'm keeping track). 


*Here's a PDF you can print onto card stock and cut a hole in. I don't know where my fancy one came from. 

Friday, January 1, 2016

Vintage Stamps Series: Space part 1, & another Giveaway!

Happy New Year! The closest I'm coming to making a resolution is a desire to post here more regularly and continue to learn new stuff. Maybe get off my ass some. But resolutions seem designed to make people feel bad about themselves and go buy gym memberships, so I avoid them.

I'm continuing the vintage stamp show-off series, and, to celebrate making it to 2016, giving away some stamps, too. Before we dig in, make sure you read to the end for giveaway details, and check out my first vintage stamps post for some tips for getting started.

Update: The Giveaway is over - the winner has been notified. 

I love myself some themes when it comes to stamps (wait until I share my Halloween-theme collection), and lately have been getting all the space-themed ones I could find (and justify the cost of). I've been wanting to show off my collection as it stands but have optimistically called this part 1 of the Space miniseries, because I hope there will be a part 2 (I'm missing several!).

I can never travel in space (claustrophobic, so the idea of being trapped in a small enclosure for any length of time...shudder), but I have been fascinated with it since my early days of watching Star Trek re-runs. One of my favorite books is The Moon is a Harsh Mistress, and I love old sci-fi movies, so fantastical/fictional imagery is fun, too. Here are the space-themed stamps I currently have, in no real order. I just re-read that and realized it sounds like I only care about fictional space. Not true. Not at all.

The 1981 Space Achievements (18¢) stamps were the first I acquired, starting with a pane of 8 tucked into a lot of loose stamps ordered from an eBay seller. They led me to start looking for other space-themed stamps.

I didn't think that these 1997 Space Discovery (32¢) stamps were real when I first saw them. I haven't done any reading on them, but the location is obviously Mars, so this fits in with my love of the fantastical and fictional, do you grok?
These 2000 Hubble (33¢) stamps are breathtaking. There are 5, with each row having a different order.

Here are a few random, loose examples:
  • 1948 3¢ Palomar Mountain Observatory
  • 1962 4¢ Project Mercury, honoring the John Glenn-piloted Mercury-Atlas 6 flight)
  • 1971 8¢ Space Achievement Decade (pictured here in reverse order)

    Below:
  • 1975 10¢ Mariner 10 (launched Nov. 1973 for a 2-yr mission to explore Venus & Mercury)
  • 1975 10¢ Pioneer (10 was launched in March 1972; 11 in April 1973)


Giveaway

Thanks for reading! I can't promise to always give away stamps when I do a vintage post, but I am this time! Winner will get the stamps in the image at top of this post (or to the right). All stamps are unused and unhinged, but not necessarily mint.

How to Enter: It's easy! Just comment here and share your favorite scientific or sci-fi work (any medium). Sharing is appreciated, but not required. I'd like to grow my readership, but I don't think that forcing people to repost and tag friends is a way to do it for real. The contest will end on January 15th. Make sure I can find you!!

Last time, only one person commented :-( , so this time, I'm hoping to DOUBLE that :-)